MiTrak User Guide

MiTrak User Guide
Table of Contents
I. Overview
A. Purpose
1. Use
II. Creating a Unit for MiTrak
A. Creating through Platform
1. Steps
B. Creating through MiTrak
1. Steps
III. User Set Up
A. Log In 1
1. First Time Connection
2. Profiles
IV. Main Features
A. Interface
1. Interface Descriptions
B. Widgets
V. Map
A. Map Mode
B. Map Widgets
VI. Tracking
A. Tracking Panel
VII. Settings
A. Menu
VIII. Configurator
A. Purpose
I. Overview
A. Purpose
1. Use
a. MiTrak is an application used for tracking GPS enabled devices. MiTrak can be installed on Android and Apple based devices.
b. Location is tracked using GPS, so the device should have a GPS receiver.
c. MiTrak position data is sent from the mobile device to the MiFleet server where it is stored. MiTrak can also send images, alarm messages, and various custom statuses.
d. Supports full integration with MiFleet, allowing you to use MiTrak for notifications, reports, jobs, etc.
II. Creating a Unit for MiTrak
A. Creating through Platform
1. Steps
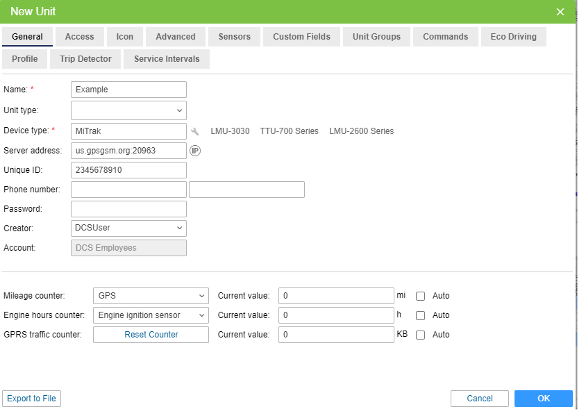
a. Name – Accept alphanumeric characters to create a unit name
b. Device type - The device type should be set to “MiTrak”
c. Unique ID - This should be the phone number of the device
d. Password - This is the password credential a user will need to access MiTrak from their device.

B. Creating through MiTrak
1. Steps
a. Log in to the application using the “Sign in with MiFleet account.” This will require a currently active MiFleet user account.
b. On the Units page, select “New Unit” at the bottom of the screen.
c. Specify the unit’s name, and ESN. For mobile devices, the phone number should be used.
d. (Optional) Set a password to access the unit from MiTrak without logging into your MiFleet account next time.
f. Finally, use the “Create Unit” button to finish creation and log in.
III. User Setup
A. Log In
1. First Time Connection
a. Enter the UID and Password associated with your mobile device. (You may need to scan or select a QR-Code depending on how your unit was set up)
b. Select a profile that best meets your requirements.
2. Profiles
a. Active
1. Data Collection: Continuous
2. Data Sending: Continuous
3. Maximum Accuracy Value: 30 Meters
b. Standard
1. Data Collection: Smart Mode
2. Data Sending: Times Out (Five Minutes)
3. Maximum Accuracy Value: 50 Meters
c. Lite
1. Data Collection: Times Out (Five Minutes)
2. Data Sending: Times Out (Five Minutes)
3. Maximum Accuracy Value: 1000 Meters
d. Custom
1. Parameters will be set individually according to the user or manager’s goals of tracking. All parameters will default to standard until altered.
IV. Main Features
A. Interface
1. Interface Descriptions
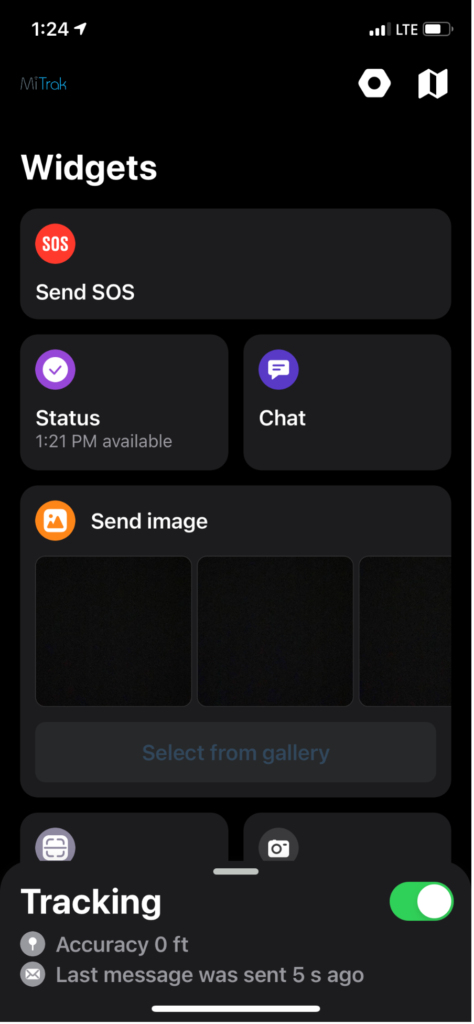
a. Logo
b. Settings
1. Used to access the settings menu.
c. Map
1. Switches your view mode. This will add a map view reduce widget card sizes.
B. Widgets
1. SOS
a. Sends an alarm message to the server when pressed.
2. Status
a. Allows the user to update their status with dispatch, appearing as either available, busy, or away.
3. Chat
a. Allows sending text messages, photos, QR codes, alarm messages, and coordinates.
4. Send Image
a. Opens the mobile device file manager or gallery to choose an image to send. Can include a caption.
5. Scan QR
a. Opens the mobile device QR-code scanner.
6. Send Photo
a. Opens the mobile device camera to take and send pictures. Also allows the user to compress images.
7. BLE Beacon
a. Displays connection state for BLE beacons that have been paired.
1. Green – Connected
2. Red – Outside of coverage area
3. Gray – No beacon paired
8. NFC
a. Available to mobile devices with NFC modules. Allows the user to read an NFC tag and send the scan automatically to the server.
b. To use the NFC feature, the option must be turned on from the application settings.
9. Send Location
a. Manually update the mobile device’s location.

V. Map
A. Map Mode
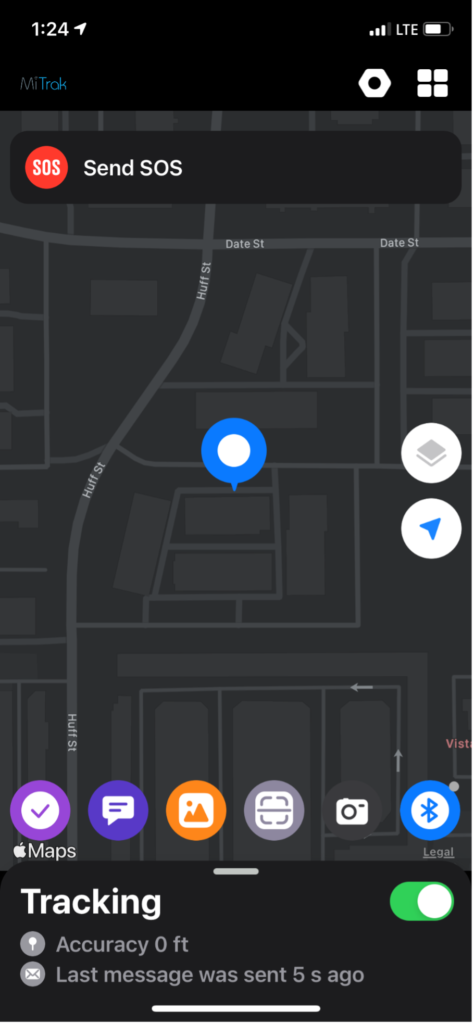
1. Allows the user to view and interact with a map.
2. The map can be zoomed, rotated, and used to self-locate.
a. To zoom in or out, use pinching/spreading gestures with two fingers. You can also double tap the map to zoom in and single tap to zoom out.
b. To rotate the map, place two fingers on the map and rotate in the desired direction. To return to the original position, tap on the compass icon on the right.
c. To instantly self-locate, tap on the arrow located above the compass.
3. Provides real time updates such as current accuracy, speed, altitude, and locational coordinates.
a. You cannot access MiFleet historical reporting, notifications, or tracks from the MiTrak application. These can be accessed from the MiFleet Mobile application.
B. Map Widgets
1. Widgets will be accessible from the bottom of the map in this mode.
2. The SOS widget will be displayed as a “Send SOS” soft button at the top of the map.

VI. Tracking
A. Tracking Panel
1. The tracking panel is located at the bottom of the application while you are in Widget mode or Map mode.
2. To view this panel, tap on the visible portion and drag upwards.
3. Offers real time insights on the current accuracy, when the last location message was reported, current speed, locational coordinates.
4. If a red exclamation mark is displayed in the tracking panel, the required settings or permissions for the device are missing or incorrect. By tapping this section, you can open a guide that will assist you in setting the right accesses.
5. The ability to turn this tracking function on or off is managed through the configurator web application.
VII. Settings
A. Menu
1. Operation Mode
a. The selection of your current operating mode can be changed here. This will only be displayed if the “Allow the user to view and select operation modes in the mobile application” option has been enabled in the configurator.
2. Widgets
a. Allows the user to configure and change settings for their widgets.
3. Troubleshooting
a. Allows a user to contact support for assistance.
b. Requires an email client installed on the mobile device.
4. View documentation
a. Brings the user to
5. Send logs
a. Sends logs to the configurator or emails the logs to support.
b. Requires an email client installed on the mobile device.
6. Unit properties
a. The Unique ID of the unit, host, and port. If logged in with a username, the name of the unit is also displayed here.
7. Work on Schedule
a. Allows the user to turn off or on the scheduled limits of MiTrak.
b. Only visible if a working schedule has been configured for the unit in the configurator.
c. The “Allow the user to turn off work on schedule in the mobile application” option must be switched on to allow the user to enable or disable this feature.
8. Logout
a. Logs out the user from the application.
9. Version
a. The application version number is displayed here.
VIII. Configurator
A. Purpose
1. Configurator Use
a. Allows fleet managers and other tracking integrators to configure profiles and generate QR codes for users to scan.


