Introduction to MiFleet

Introduction to MiFleet
Table of Contents
Terms
Tool Tips
Menu Buttons
Access Tab
Basics
Terms
Map: Refers to the interactive metaphysical map that is used in all tabs of the platform.
User: An account created for an individual or group that allows that person or group to log into the platform.
Unit: Any device that is on the platform. Access and permissions can be adjusted based on requirements.
Sensor Values: Metrics that the device measures and reports back to the platform. This raw data is then turned into and presented as readable data in the platform.
Tool Tips
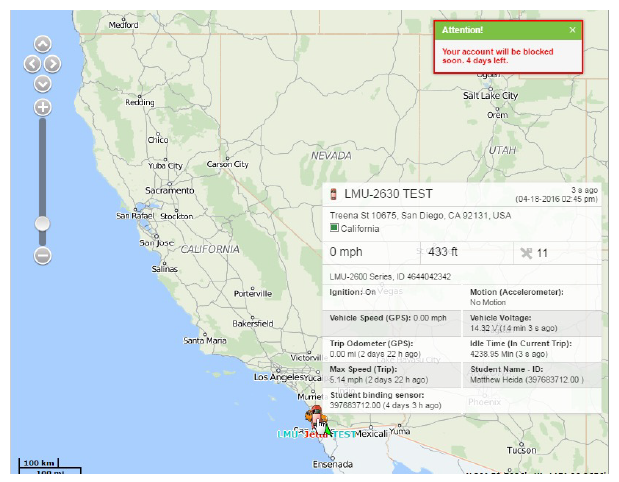
Many items have tool tips, which give you more information about a specific item. To view this, move the mouse to hover the cursor over an object or item.
For example, hover over a unit (vehicle) to see general information of the unit. In this case, you can view current speed, if the ignition is off, max speed, how many satellites are currently locked on the unit, and many more.
Menu Buttons

Click on the word to change to the next tab. The menu tabs that you can view are customizable. Click the three dots in the top right and check or uncheck your desired options.
Access Tab
The Access tab is available on several types of items, including:
- Units
- Unit Groups
- Users
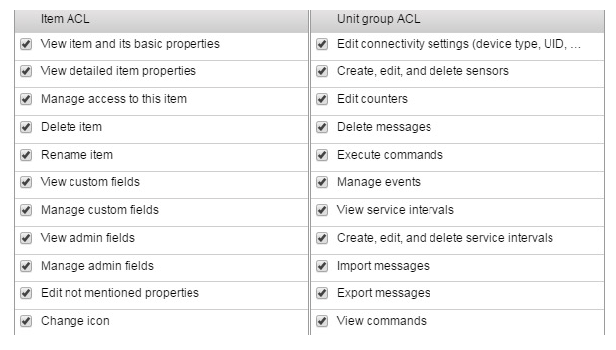
This tab gives you access to modify a user’s rights to a unit or unit group. Default templates (similar to below) will vary depending on the type of item, Unit, Unit Group, or Users.

If different access is needed, you can modify individual rights through the Access Control Lists below
Dashboard

The Dashboard tab will give you an overview of all currently monitored devices for the account. By default, this tab has nine tables that can be moved around and customized to your preference. To customize this, use the three dots in the top right as pictured below.
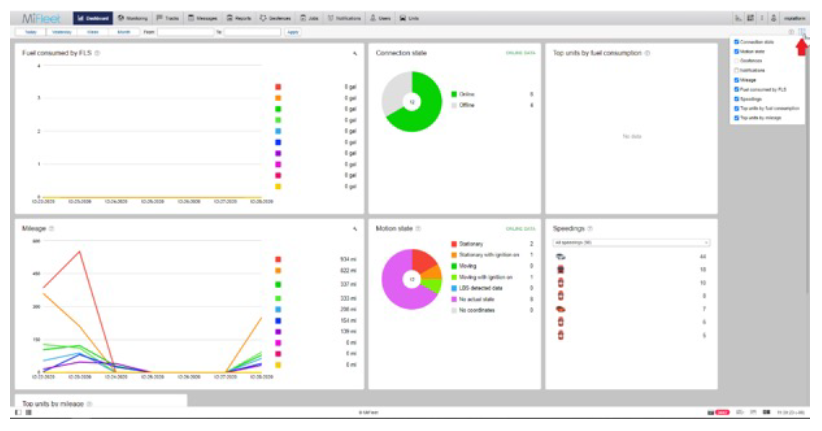
Simply click the wrench in the top right of any chart to customize what you can or cannot see. Click and drag from the top of a chart to reorganize the order in which each chart is displayed.
You can use a preselected time or use your own interval for as long back as data is stored (365 days.)
Charts spanning multiple days will truncate into dots if you select a single day interval.
Monitoring
Allows you to check on specific vehicles and get snapshot sensor value information. Also provides several “quick” options and tools.

The ![]() symbol is used to show you which drivers, if any are assigned, are using the unit.
symbol is used to show you which drivers, if any are assigned, are using the unit.
The ![]() symbol is used to “watch unit on map,” which will force the map to follow the unit for each device message it sends.
symbol is used to “watch unit on map,” which will force the map to follow the unit for each device message it sends.
The ![]() symbol is used to show current motion status of the device. This will also indicate if the ignition of the vehicle is on, and whether the vehicle is moving or not.
symbol is used to show current motion status of the device. This will also indicate if the ignition of the vehicle is on, and whether the vehicle is moving or not.
The ![]() symbol is used to indicate connection status. The left bar indicates how many satellites are locked on. The right bar indicates the last time the device checked in, and how long ago that was.
symbol is used to indicate connection status. The left bar indicates how many satellites are locked on. The right bar indicates the last time the device checked in, and how long ago that was.
The ![]() symbol is used to indicate unit connection status. If a unit is online, it will fill in green.
symbol is used to indicate unit connection status. If a unit is online, it will fill in green.
The ![]() symbol is used to indicate sensor state. This is typically unused.
symbol is used to indicate sensor state. This is typically unused.
Clicking on the ![]() symbol will display the most recent track information on the map. Please see the “Tracks” section for more information regarding tracks.
symbol will display the most recent track information on the map. Please see the “Tracks” section for more information regarding tracks.
Clicking on the ![]() symbol will generate a quick report based on what in your reports list populates first. Please see the “Reports” section for more information regarding reports.
symbol will generate a quick report based on what in your reports list populates first. Please see the “Reports” section for more information regarding reports.
The symbols ![]()
![]() indicate media used for tracking the vehicle. If an associated device is connected, you can quickly view the device from here.
indicate media used for tracking the vehicle. If an associated device is connected, you can quickly view the device from here.
The ![]() symbol is used to quickly send a command to the unit. This command will send via SMS and is predetermined under that unit’s “Commands” tab in properties.
symbol is used to quickly send a command to the unit. This command will send via SMS and is predetermined under that unit’s “Commands” tab in properties.
The ![]() is used to send SMS messages to units. This is not available on all devices.
is used to send SMS messages to units. This is not available on all devices.
The ![]() symbol is used to adjust the Unit properties of the selected device. Please see the “Units” section for more information regarding reports.
symbol is used to adjust the Unit properties of the selected device. Please see the “Units” section for more information regarding reports.
The ![]() symbol will pull up additional options:
symbol will pull up additional options: ![]() These options will let you report an event, check the battery remaining, and see data for attached trailers, respectively.
These options will let you report an event, check the battery remaining, and see data for attached trailers, respectively.
Lastly, the ![]() symbol will remove the device from your work list.
symbol will remove the device from your work list.
THIS WILL NOT PERMANENTLY DELETE THE UNIT UNLESS IT IS DONE IN THE UNITS TAB.
You can view a unit’s tooltip by hovering your mouse over the unit in the work list, or by click on the icon associated with the unit.
Tracks
Allows you to see the travel history of a unit or multiple units. To do this:
Select a unit from the “Unit” drop down list, select a color for the history (if you would like to change it), then select your time interval, and click on Show Track. To add multiple units, complete a single Show Track, then select another unit from the “Unit” drop down, select your options and click Show track.
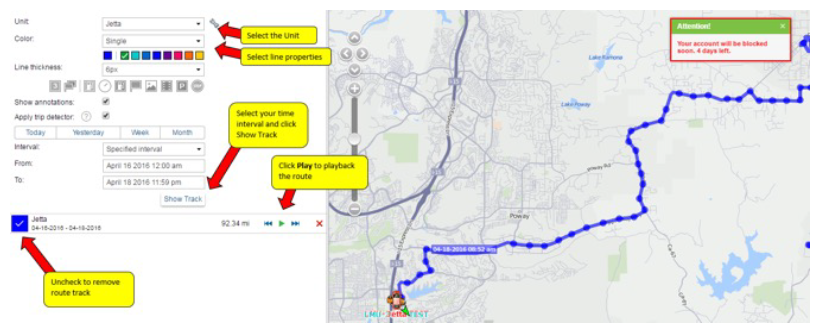
Each check in and heading change will appear as a clickable point on the map. You can view snapshot sensor data by clicking on the point to see what was happening at that time and location.
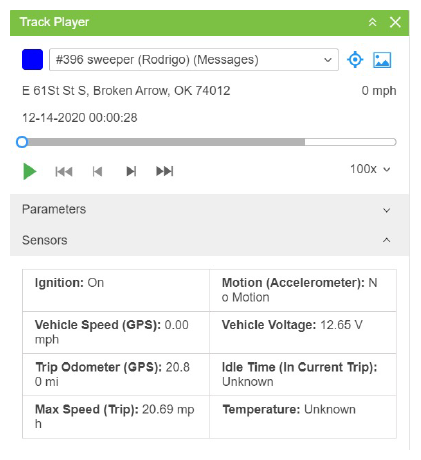
You can also use the track player to examine a route more closely. The track player will by default open a miniature map box featuring a google street view playing of the track selected. You can also use this section to view sensor and parameter values.
Reports
Default reports are shown below.
They can be scheduled for specific times or when events are triggered.

If you would like to create your own report, you can use the “New” button located on the work list.

From the new dialogue, you can select what type of report you would like, as well as what will be included.
Reports can be as simple or complicated as you require. The data you receive when a report is executed is organized into tables charts. You can add, remove, or edit additional settings in a report to change the way a table or chart is presented.
First, select a type. Then, check the boxes of each value that you want to see expressed in your report.
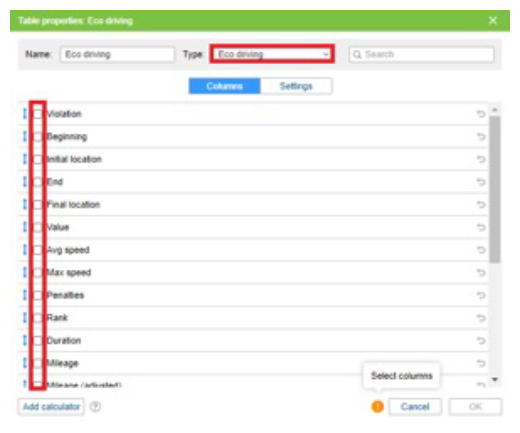
Then, simply name your report and click “OK”
You can use the icon to adjust the report after it has been created.
Geofences
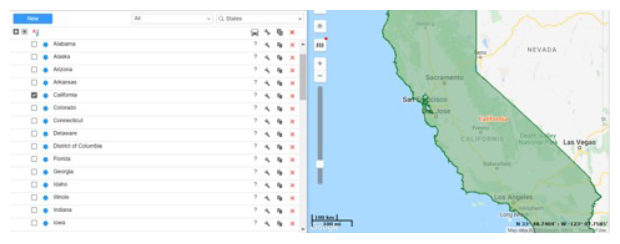
Geofences trigger an event, you can use the default ones (state boundaries) and/or you can create your own. With Geofences, you can create Notifications (Notifications Tab > New) to create a trigger when a unit is inside or outside the Geofence.
Default Geofences include all 50 states, click on a Geofence to highlight and show on map
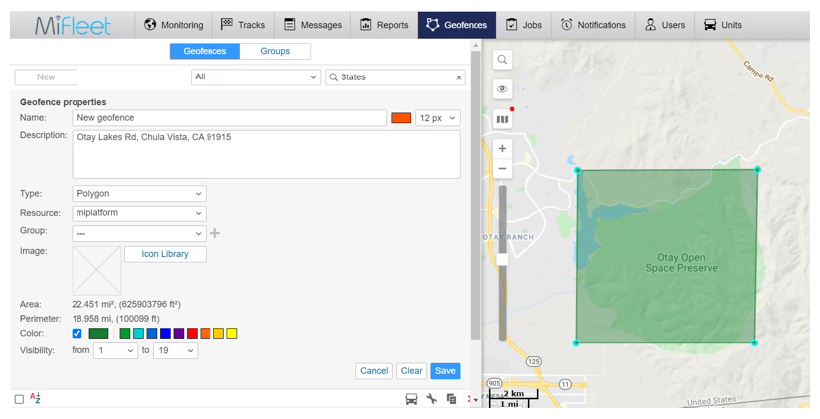
To Create a new Geofence, click on New on the top left, and follow the help guidelines as displayed on the map, change your options as you like, then click on Save. If you would like to delete the Geofence later, you can click on the Red X next to the item in the list to delete. THIS WILL PERMANENTLY DELETE THE GEOFENCE.
Jobs
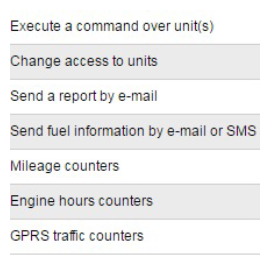
Jobs are automatic execution of a specific command, which include the below types:
The default Jobs are to send a report by email. For example:
- Daily Report
- End of Day
In these report jobs, you can schedule the report to be sent to multiple email addresses or phone numbers. These reports include an exact longitude and latitude of the event trigger with a clickable hyperlink to the exact Google Maps address. There are several text codes that you can use to customize how your Report is sent by your Job, which will be displayed below the message contents.
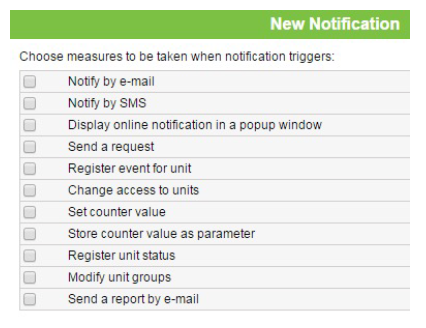
Notifications
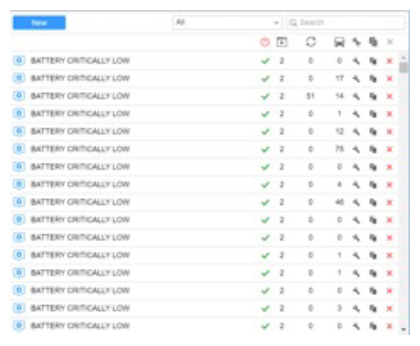
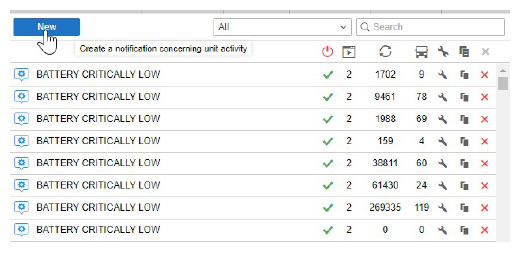
There are several pre-made notifications you can use, or you can make your own.
To create a new notification, select “New” in the top left of your work list.
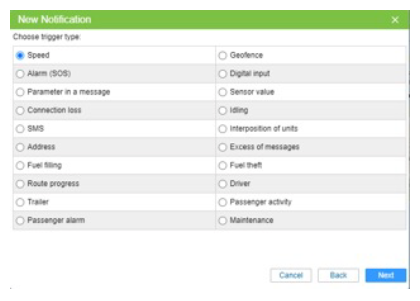
Then, select which template you would like to build your notification under. Typically, this would be your account. After your account has been selected, select which units you would like to include in the notification. Then, select a trigger type. All Notifications require a trigger.
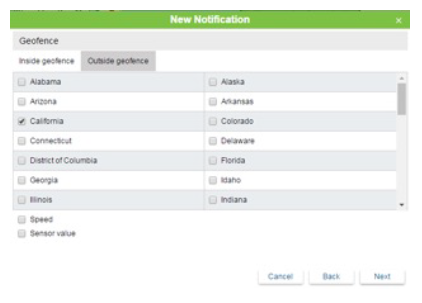
With Geofence triggered Notifications, you have the option to select the Geofence(s) whether the event is triggered when the unit is inside or outside, along with the type of notification:
Users
By default, your account will come with a primary login, which you can share or keep private. You can create new users as needed and give them duplicate access or limited access.
PLEASE NOTE: Accounts created under a user who does not have full access to the system may be limited in the rights they can be granted. A user cannot grant another user more rights than they have.
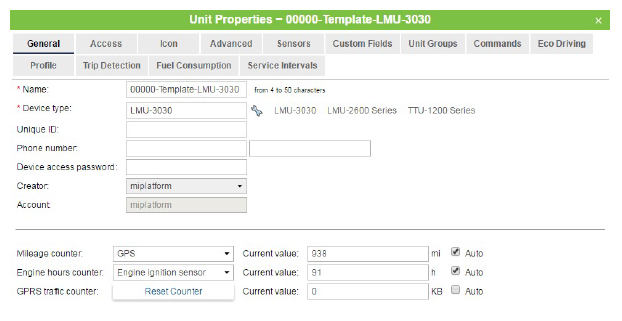
Units
By default, your account will already have your newly purchased units loaded.
Here, you can see or edit various unit properties, such as the device name. We do not recommend changing others, as there is the possibility of breaking the connection between the device and the platform.
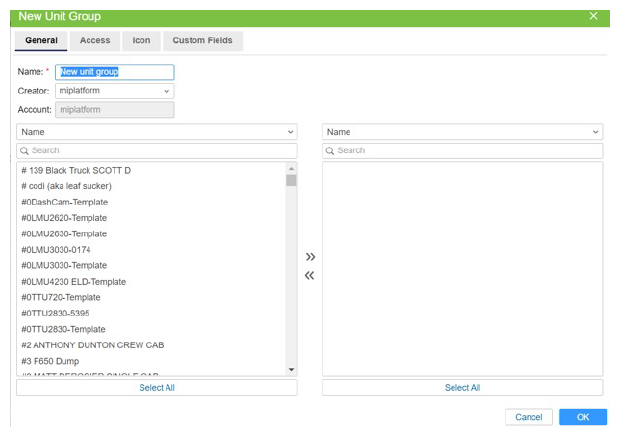
Unit Groups
By Default, you will have a single Unit group, however as your fleet grows and the number of your devices grow, you can create more groups to keep the units organized. To do this, simply select the “Units” tab, select “Groups,” and then select “New.”

Then name the group, change your search topic, and add or remove devices using the arrows provided in the new window.
Tools

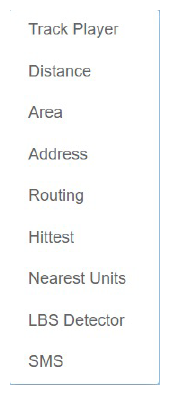
There are several other tools available in the MiFleet platform that you can use to customize your experience.
Track Player: Used in the same way as the track player under the tracks tab.
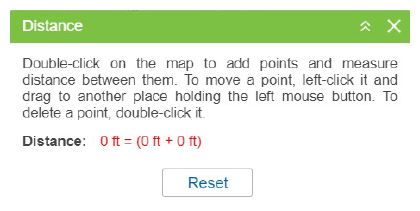
Distance: By double clicking on the map and creating two points, you can measure the distance between them.
Area: By double clicking on the map, you can draw a polygon. You can get the perimeter as well as the area of the polygon using this tool.

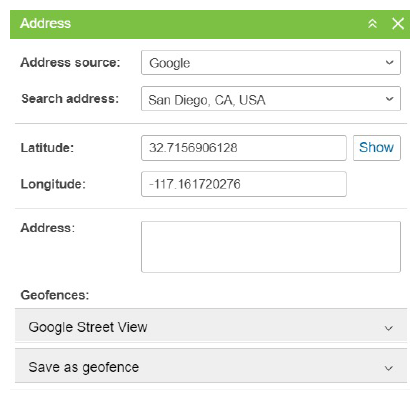
Address: You can enter an address or coordinates to bring up info about that area. This includes geofences, Google Street View, and the ability to save the area as a geofence.
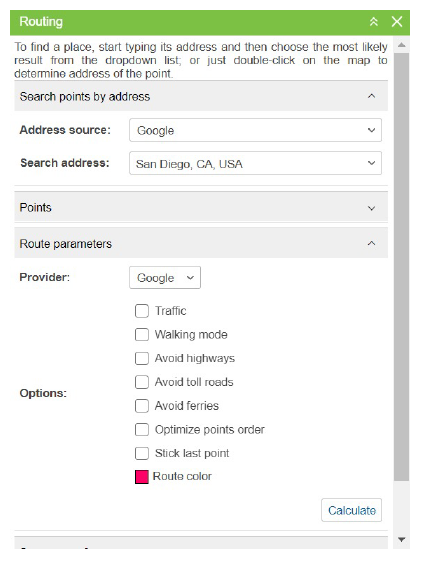
Routing: Use this to draw a route on the platform that you can then save as a route or a geofence.
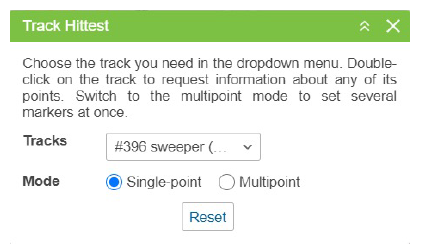
Track HitTest: Provides snapshot sensor value data on a track point where you have selected.
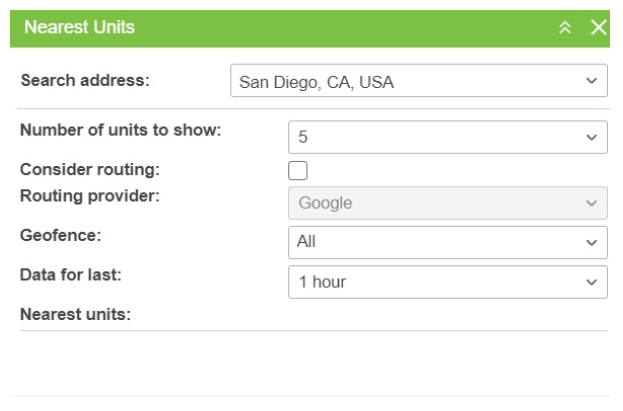
Nearest Units: Used to show a determinable number of units closest to a selected location. Can also consider routing and geofencing.
LBS: Used to locate units by means of cellular base stations without GPS.

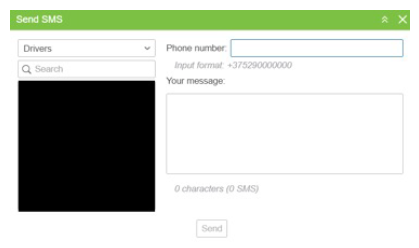
SMS: Used to send commands and messages to units.
THIS PRODUCT WAS LAST UPDATED DECEMBER 23, 2020. ALL DOCUMENTS WITH AN UPDATE PRIOR TO THIS DATE ARE OBSOLETE.
