Introduction
Fleetrun is an application designed to manage the process of vehicle maintenance, control the expenses associated with the operation of vehicles and, as a result, improve their performance. The application can be used by managers and engineers of fleets, individuals responsible for the material and technical resources, drivers and vehicle owners, etc. to record the cost of repair work and minimise it due to well-timed service.
The main functions of the application are:
- creation of service intervals;
- control of the vehicle operation costs;
- creation of notifications for the events related to the vehicle service;
- generation of reports on the services carried out for the units of the fleet.
To work with the Fleetrun application, the same-name should be activated in the monitoring system for the user account.
To enter the application, specify the username and password on the login page and press Authorize.
Depending on whether the user has dealer rights and also on whether a fleet has been created for him, either interface is available to him.
Supported Browsers
Fleetrun supports the following browsers:
- Google Chrome;
- Mozilla Firefox;
- Opera;
- Microsoft Edge.
Browsers should be updated to the current version. Otherwise, the application may not work or work incorrectly.
User Interface
This interface is available for users who have access to the fleet.
The window of the application consists of a navigation bar located at the top and a workspace occupying the rest of the window.
In the navigation bar you can select one of the available tabs:
- Dashboard;
- Units;
- Intervals;
- Services;
- Reports.
Click on the user name in the right corner of the navigation bar to open the menu with the following items:
- User settings
Selection of language and date format, notifications configuration.
- Activation
Page where fleets can be activated or suspended (applicable to the subordinate accounts). This item is available to a user with administrator rights.
- Line items library
Register with the information about the costs of parts and labour.
- Administration
Page where access rights to the fleet and its settings are managed. This item is available to a user with administrator rights.
- API tokens
Page where API tokens can be created and viewed.
- Documentation
Link to the documentation.
- Exit
Logout from the application.
Notifications about the change of the status are also displayed in the navigation bar ().
Direct interaction with the system within the selected section takes place in the workspace below the navigation bar.
The set of available menu items may vary for different users depending on the access rights.
User Settings
Depending on the user’s access rights, the contents of the settings menu may vary.
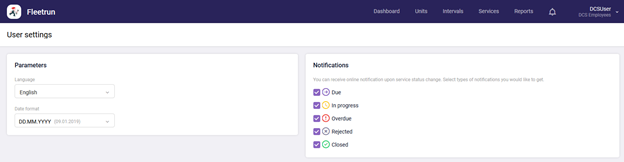
The following settings may be available:
- Fleet
Select the fleet: if several fleets are available, first choose one of them.
- Parameters
Indicate the language and date format.
- Notifications
Choose the types of notifications that should be displayed in the navigation bar.
Line Items Library
Line items library is the register with the information about the costs of vehicle maintenance. There are two types of costs: for parts and for labour. You can later use them while creating intervalsand services.
The library is presented as a table and has the following columns:
- Name;
- Type;
- Cost;
- Editing and deleting.

The table can be sorted by the name of the registered items (in direct or reverse alphabetical order) and by cost (in ascending or descending order) using the arrow icons in the name of the columns. Filtering by the type of line item is also available. Possible options: Any, Part, Labour. The dynamic filer above the table helps quickly find the required item.
To export the table to a CSV file, click on the button located to the right of the dynamic filter.
To add a line item, click the Add button in the upper right corner.
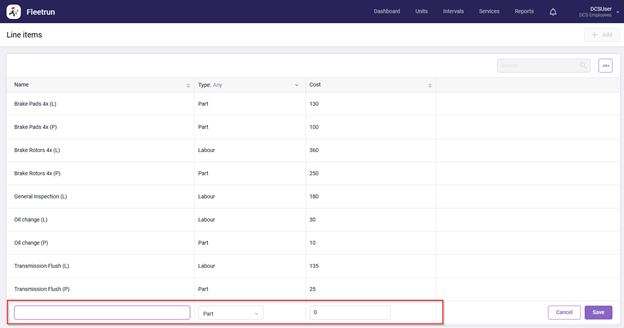
In the row that appears, fill in the required information and click Save. The new item is first displayed at the bottom of the list, but once you refresh the page, it takes its place according to the sorting. If the type of a new line item does not coincide with the one selected in the filter, it is not shown in the list until the suitable type is selected.
Line items created at the time of interval or service creation are added to the library automatically.
Dashboard
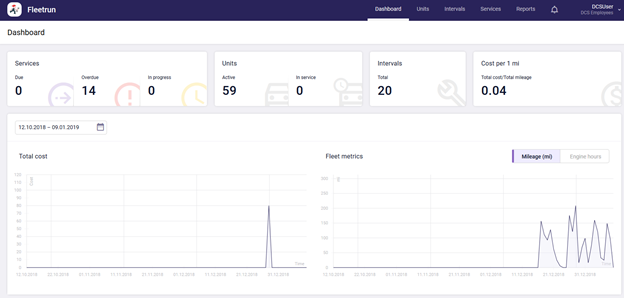
The Dashboard page is available only to users for whom a fleet is activated, and contains the summary of its contents.
The information presented on this page allows to assess the overall situation in the fleet, draw attention to an overdue service, estimate the ratio of units in use and units in maintenance, count the total cost of expenses, etc.

The information on this page is presented in blocks. Clicking on the Services, Units and Intervals blocks opens the corresponding pages. If the access rights to services are absent, the Servicesblock is not displayed.
The following information blocks are presented on the Dashboard page:
- Services
Due — the number of scheduled services with the Due status.
Overdue — the number of scheduled services, the status of which was not changed to In progress or Closed in time.
In progress — services with the In progress status, that is, the ongoing services.
- Units
Active — the number of fleet units that are not currently serviced.
In service — the number of units that are undergoing maintenance.
- Intervals
The total number of intervals created for the fleet.
- Notifications
The number of new (unread) notifications.
- Total cost
The graph containing the information about the total cost for the stated period.
- Fleet metrics
The graph containing the information about the total mileage or engine hours (selected with the help of the switch) of the fleet for the stated period.
The time interval for which the data should be displayed in the graphs is selected in the calendar located in the upper left corner of the block. Depending on the position of the switch in the calendar, graphs can be built by day (linear) and by month (columnar). The interval can be indicated manually. To do it, mark the start and finish dates in the calendar or select one of the preset intervals. To receive the information for one day (for a graph by day) or a month (for a graph by month), double-click the required date or month in the calendar.
- Cost per 1 km/mi
The average cost of all services of all units of the fleet for 1 km/mi. To calculate it, the total cost of maintenance of all units of the fleet is divided by their total mileage in the application.
Units
The Units page displays the list of units of the fleet and basic information on them.
The page contains the table with the list of units. For each unit the following information is provided (if available):
- Type — the type of vehicle specified in its profile. By default, Other is selected for all units. The type can be changed directly from the table by clicking on the icon in the Type column and selecting the required one from the list.
- Unit — the name of the unit and its description (if specified in the profile);
- Mileage — current mileage value;
- Engine hours — current engine hours value;
- Due — the number of the upcoming services;
- Overdue — the number of the overdue services;
- In progress — the number of services in progress.
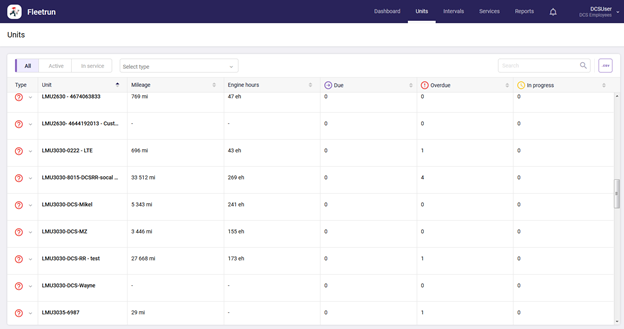
The switch above the table allows to display active units (the Active button) or the units that are currently being serviced (the In service button).
To quickly find the required unit, use the dynamic filter.
The list of units can also be filtered by the vehicle type. Using the Select type filter, choose the required vehicle type (the maximum number is 5).
To export the table to a CSV file, click on the button located to the right of the dynamic filter.
When you hover the cursor over the line with the unit, the button appears on the right. Click this button to create a new service.
Unit Properties
Click on the row with the unit to view its detailed information.
The data is presented on the following tabs:
- Unit info;
- Services;
- Assigned units
- Unit profile.
In the upper right corner, there is the Create service button which allows you to create a service for the selected unit.
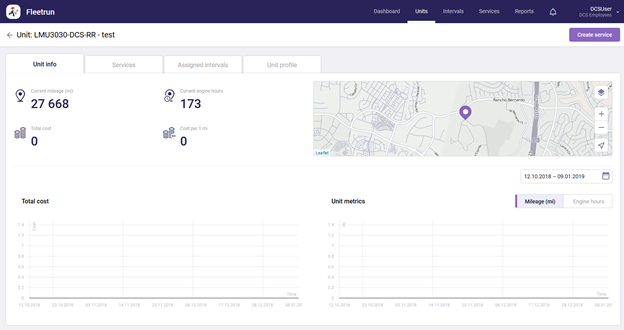
Unit info
The Unit info tab is divided into two blocks.
The upper block displays the main characteristics of the unit: current mileage and engine hours, total cost of services and average cost of services per kilometer (mile). To calculate the average cost of services, the total cost of unit maintenance is divided by its total mileage in the application. The current location is also displayed here on the map (the information is taken from the most recent message received from the unit). The map can be scaled using the buttons in its left corner and moved by dragging in the required direction with the left mouse button. When you hover over the icon , the menu appears. In this menu, you can select the map layer. The button allows to center the map on the unit.
In the lower block of the Unit info tab, there are two charts:
- Total cost — a graph containing the information about the total costs for the specified period.
- Unit metrics — a graph containing the information about the mileage and engine hours (depending on the position of the switch) of the unit for the specified period.
The time interval for which the data should be displayed in the graphs is selected in the calendar located in the upper left corner of the block. The interval can be indicated manually. To do it, mark the start and finish dates in the calendar or select one of the preset intervals (week, month, quarter, year). To receive the information for one day, double-click the required date in the calendar.
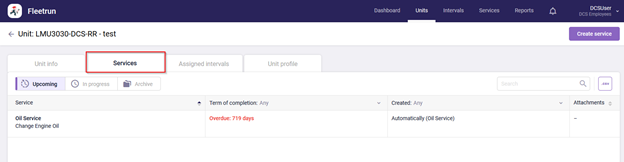
Services
This tab displays the information about all the services of the unit (upcoming, in progress, and completed).
Depending on the position of the switch in the upper part of the tab, the tab displays the upcoming, archived (completed) and services in progress. The information about the services is presented in the form of a table. The set of columns depends on the position of the switch.
Click on the row with the service to go to its settings in the Services page.
Assigned intervals
Here you can select a service interval from the list of the available ones and assign it to the unit. Once the interval is assigned, its service is created automatically.
There are two lists on the Assigned intervals tab: the left one displays the intervals assigned to the unit, the right one — all the intervals created for the fleet.
To assign an interval to a unit, check the required interval and click on the left pointing arrow. To quickly find an interval, use the dynamic filter above.
If you want to check all the intervals, click Select all. Click Unselect to remove the selection, or uncheck the required boxes.
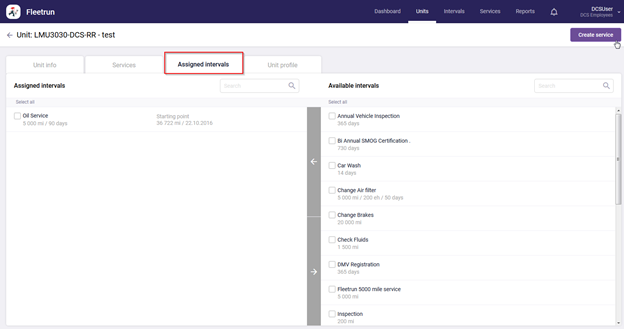
Intervals are unassigned from the units in the same manner.
For each assigned interval, the following information is presented: its name, frequency of completion, and the data about the latest maintenance (mileage, engine hours, date — depending on the interval settings). By default, the actual data at the moment of assigning is used. To specify this data manually, click on the icon , that appears at the end of the line with the interval when you hover the mouse over it. In the window that opens, indicate mileage, engine hours and/or date at the time of the latest service interval and click Save.
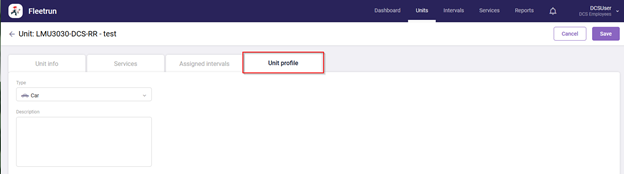
Unit profile
Here you can select the vehicle type and add a description (the maximum length is 512 characters).
The following types are available:
- Lorry;
- Microbus;
- Van;
- Pickup;
- Tractor;
- Tipper;
- Heavy truck;
- Manipulator;
- Bus;
- Car;
- Motorbike;
- Stationary;
- Refrigerator;
- Specialized vehicle;
- Other.
By default, Other is selected for all units.
Intervals
Interval is the type of the vehicle maintenance work, as well as the frequency of this maintenance.
Here you can create and edit service intervals, as well as assign units to them (if a unit is assigned to the interval, services are created automatically).
The table on this page contains the following columns:
- Interval — the name of the service interval.
- Frequency — the frequency of execution specified in the properties of the interval.
- Advance notice — automatic creation of services based on the interval (how many kilometers, engine hours or days before the expiration of the period a service should be created).
- Assigned units — the number of units assigned to the interval.
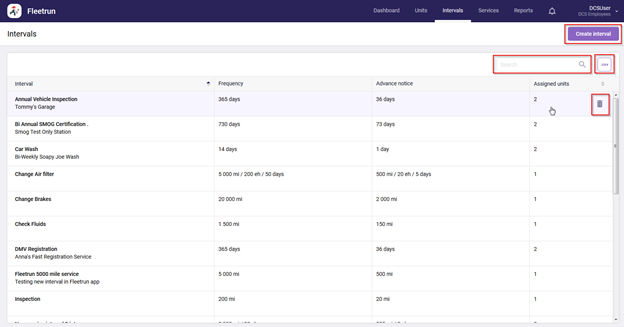
When you hover the cursor over the row in the table, the icon appears at the end of it. Click on it to delete the interval from the system.
To quickly find the required interval, use the dynamic filter above the table.
To export the table to a CSV file, click on the button located to the right of the dynamic filter.
To edit the service interval, click on its line in the table.
Creation of Intervals
Click on the Create interval button to add a new interval. The window that opens contains the following tabs:
- General;
- Line items;
- Assigned units.
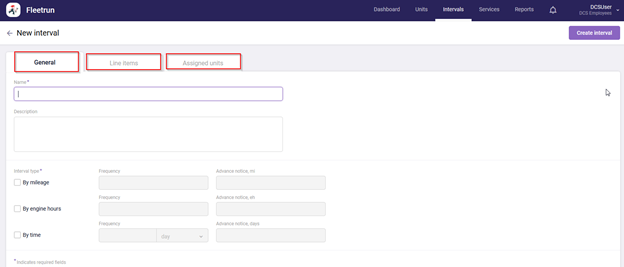
General
The basic settings of the service interval are indicated on the General tab: its name, description, frequency and terms of advance creation of its services. The required fields are marked with and asterisk (*).
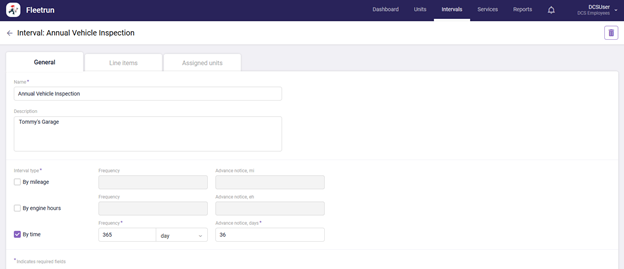
Name — required field. The maximum length is 128 symbols.
Description — description of the service interval. The maximum length is 512 characters.
Type of interval — criterion that defines the frequency of service intervals. Three options are availbale:
- by mileage;
- by engine hours;
- by time.
For each service interval you can indicate several types.
Type of interval is an essential property of the interval, so at least one type should be indicated.
For each type of interval, the frequency is indicated, that is, how often services should be created for it. In the Advance notice field, specify how many kilometers (miles)/engine hours/days in advance the upcoming service should be created based on this interval.
If 0 is indicated in the Advance notice field, the service is created when the mileage/engine hours/days value specified in the Frequency field is reached.
If several types of intervals are indicated, the service is created based on the type whose value is reached first.
To receive notifications about the upcoming services, check the corresponding item in the Notifications block in the user settings.
If any of the required fields on the General tab are not completed, it is not possible to save the interval: the error message shows up and red prompts appear pointing at the fields that must be filled in.
Line items
On the Line items tab, you can indicate the cost of spare parts and labour for the service interval.
The cost can be specified in two ways: by entering the total cost or list the cost of all the parts and types of labour. In the latter case, the total cost of maintenace is calculated automatically.
To specify the total cost of maintenance, enter it in the Total cost field.

Use the button in the upper right corner if you need to enter the cost of all parts and labour. Clicking on it adds one line item. For the line item, specify the following:
- Name
Click on the Name field to see the list of previously created line items from the library. The field itself works as a dynamic filter, which allows you to quickly find the required item in the list. The filter shows only those line items that correspond to the specified type. Once the line item is selected, the Type and Cost fields are filled in automatically (can be edited if necessary). You can also enter a new line item manually. In this case, the line item is added to the library after saving the service interval.
- Type
Select one of the available options: Part or Labour. Part is selected by default.
- Cost
Enter the cost (up to 10 characters). The point (.) is used as a separator.
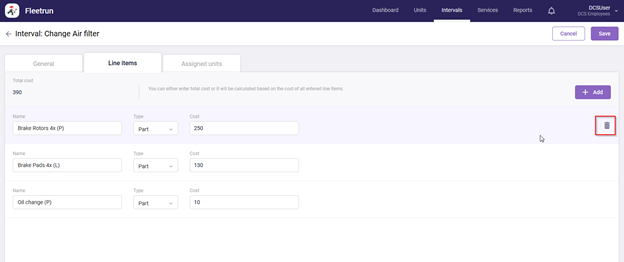
To delete a line item, press the icon ![]() that appears at the end of the line when you hover the mouse cursor over it.
that appears at the end of the line when you hover the mouse cursor over it.
Assigned units
Here you can assign available units to the service interval. If a unit is assigned to the service interval, services are created for it automatically based on the interval.
There are two lists on the Assigned units tab: the left one displays the units assigned to the interval, the right one — all units of the fleet.
To assign units to the service interval, select the required ones in the list of the available units and press the left pointing arrow. To quickly find the required item, use the dynamic filter above.
To check all the units in the list, use the Select all button. The checkboxes can be unselected manually or with the help of the Cancel button (removes the selection from all units).
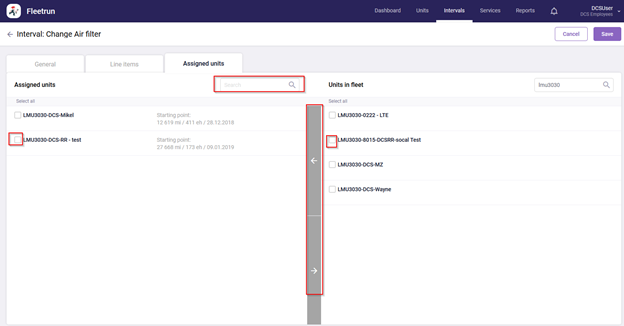
Units are removed from the service interval in the same manner.
For each assigned interval, the following information is presented: its name, frequency of completion, and the data about the latest maintenance (mileage, engine hours, date — depending on the interval settings). By default, the actual data at the moment of assigning used. To specify this data manually, click on the icon that appears at the end of the line with the interval when you hover the mouse cursor over it. In the window that opens, indicate mileage, engine hours and/or date at the time of the latest service interval and click Save.

To save the created service interval, press the Create interval button in the upper right corner of the window. To cancel the changes, return to the list of the intervals by clicking on the arrow pointing left in the upper left corner.
Services
Service is the maintenance work of the vehicle. Services can be created manually or automatically (based on the service intervals).
On this page, you can see a table with the list of maintenance services created in the system.
There are three tabs, each corresponds to the time of the completion of the service:
- Upcoming;
- In progress;
- Archive.
Each tab contains the dynamic filter which allows to quickly find the required service and the button Create service to create a new one manually. Required fields are marked with an asterisk (*).
To export the table to a CSV file, click on the button located to the right of the dynamic filter.

Upcoming — scheduled services from the moment of creation to their rejection or manual change of status to In progress or Closed. Such services only have a start date.
Services whose status does not change timely are marked as overdue. The information about the number of such services is shown in the Services section of the Dashboard page.
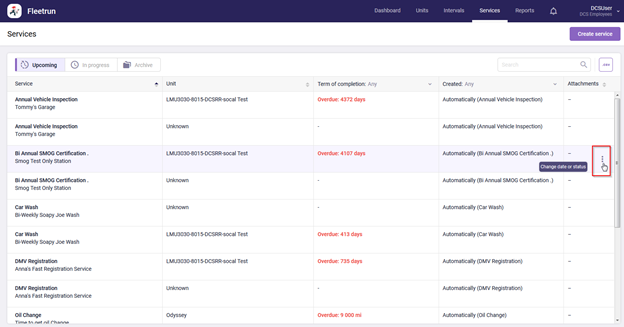
The table of the upcoming services includes the following columns:
- Service — the name of the service and its description (if there is any).
- Unit — the vehicle for which the service is being carried out.
- Term of completion — the information about the time of service completion. The table can be filtered by the contents of this column in accordance with the status of the service. Three options are available: Any (all the upcoming services are displayed), Due (only the services the deadline for which has not come yet are displayed), Overdue (only the services whose term of completion has passed are displayed). If a service is created automatically based on the service interval, it becomes overdue the next day/kilometer (mile)/engine hour after the interval ends (depending on the type of interval).
- Created — the method used to create the service. The table can be filtered by the contents of this table according to the method of service creation. Three options are available: Any, Manually (from the Units or Services pages) and Automatically (based on the service interval).
- Attachments — the number of files attached to the service.
When you hover the cursor over the line with the service, the icon appears. Click on it to open the menu that provides quick access to editing the date and/or status.

In progress — services that are currently being done. Such services only have a starting date.
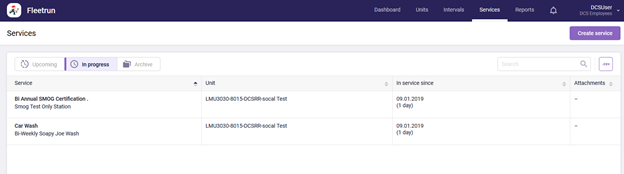
The table of the services In progress has the following columns:
- Service — the name of the service and its description (if there is any).
- Unit — the vehicle for which the service is being carried out.
- In service since — the start date and duration of the service at the current moment.
- Attachments — the number of files attached to the service.
When you hover the cursor over the line with the service, the icon appears. Click on it to open the menu that provides quick access to editing the status.
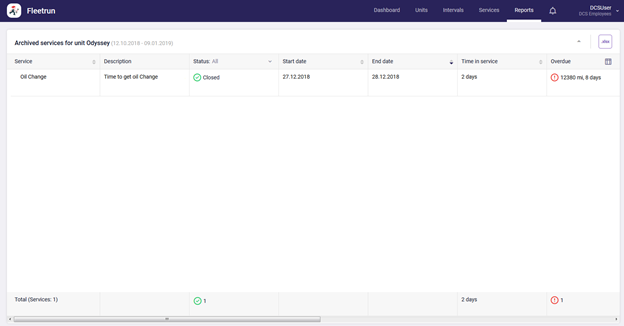
Archive — closed or rejected services.
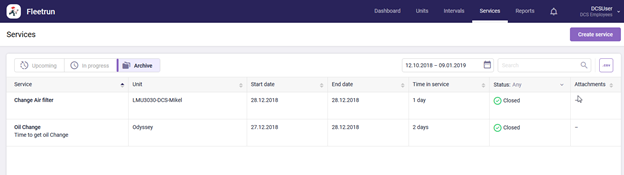
The table of services in the archive includes the following columns:
- Service — the time of the service and its description (if there is any).
- Unit — the vehicle for which the service is being carried out.
- Start date — the start time of the service specified in its properties (not displayed for rejected services).
- End date — the time of service completion specified in its properties (not displayed for rejected services).
- Time in service — the duration of service in days.
- Status — the result of the service. The table can be filtered by the contents of this column in accordance with the status of services. The following options are available: Any, Closed, Rejected.
- Attachments — the number of files attached to the service.
Services in archive can only be viewed, editing is not possible.
Manual Creation of Services
Click on the Create service button in the upper right corner to add a new service. This button is also available in the properties of the units (in this case, the unit for which the service is created is automatically specified in the Unit field).
Two tabs are available in the service creation window: General and Line items.
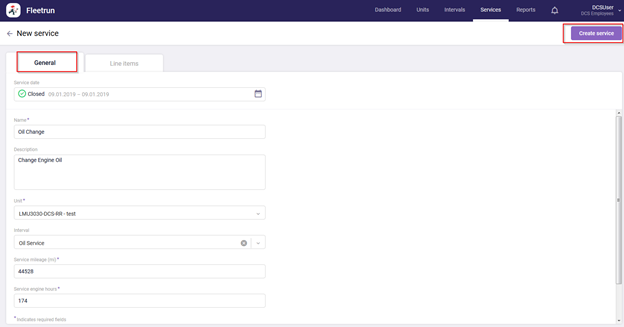
General
On the General tab, the basic properties of the service are indicated: date, name, description, unit, interval, mileage and engine hours values. It is also possible to attach a file (the Attach filesbutton).
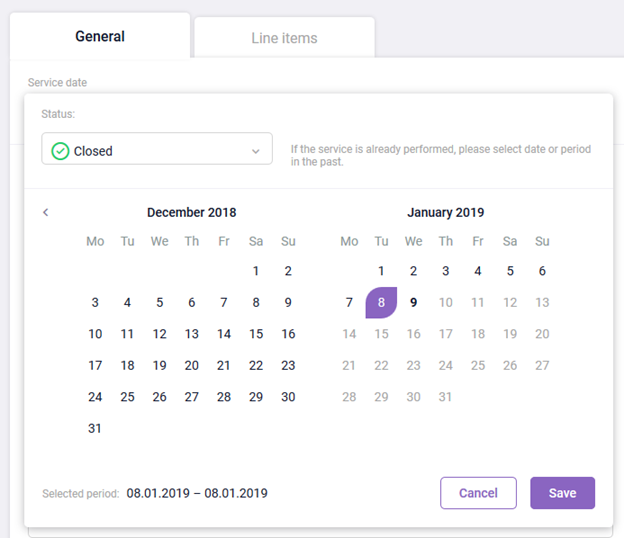
Service date
Here you can indicate the status of the service and the date of its completion. Click on this field to open the menu. In its upper part, you can select the status (Due, In progress or Closed), and in the calendar below — its time frames (in accordance with the selected status).
For the service with the Due status, indicate the scheduled date (future or current), for the In progress status — the start date (past or current), for the Closed status — the dates of start (past or current) and end (past or current). To mark one day as the start and end of the service, double-click on it in the calendar.
- Name
The name of the service. The required field. The maximum allowed length is 128 characters.
- Description
A commentary on the service. The maximum allowed length is 512 characters.
- Unit
The name of the vehicle for which the service is being created. The field works as the dynamic filter that allows you to quickly find a unit from the list of the available units. To clear the field, click on .
- Interval
If service intervals are assigned to a unit, here you can indicate one of them. In this case, the data of the Name and Description fields, as well as the data on the Line items field are filled in automatically (provided they are filled for the selected service interval). To clear the field, click on .
- Service mileage
The mileage value at the moment of service. By default, the actual data at the moment of service creation is used. The required field.
- Service engine hours
The engine hours value at the moment of service. By default, the actual data at the moment of service creation is used. The required field.
The files of the following formats can be attached to a service: JPEG, PNG and PDF. The maximum total size of all attachments should not exceed 32 MB.
To remove an attached file, hover the mouse cursor over its thumbnail and press the icon . Clicking on the thumbnail itself opens the file in full size in a separate browser tab.
Attaching and deleting files is not available for the services in the archive.
Line items
On the Line items tab, you can indicate the cost of parts and labour for the service. The principle of adding line items is the same as in the service intervals.
Automatic Creation of Services
Automatic creation of services is possible if a unit is assigned to a service interval (or an interval is assigned to a unit).
The service is created when the conditions specified in the fields associated with the type of interval are met. If several types are indicated, the service is created after the completion of the first condition.
Example. A unit has a service interval for which two types are indicated: by mileage (every 15 000 km) and by time (every year). For each of the types, values 200 km and 14 days are indicated in the Advance notice field.
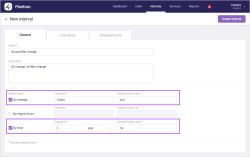
The service for such an interval should be created either 14 800 km (15 000 – 200) or 351 days (365 – 14) after the previous service.
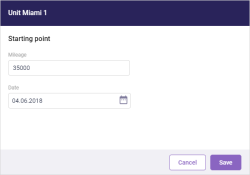
Suppose a unit traveled 14800 km in 7 months. In this case, the upcoming services are created on the basis of the mileage value. After the service is complete, a new period starts (data from the Starting point field of the unit properties is used).
When a service is created automatically, those values at which the maintenance is scheduled are indicated in the Service mileage and Service engine hours fields. That is, the values are calculated according to the following ‘formula’:
Service mileage/engine hours at the moment of the latest service + value from the Frequency field from the properties of the interval based on which the service is created.
To create new services, intervals are processed once an hour, but if a message is received from the unit, services may be created earlier (right after the arrival of the message).
Reports
Reports allow to view detailed information about the previous services, estimate the ratio of closed, rejected and overdue services, their total cost, etc.
Three types of reports are available in Fleetrun:
- Fleet archived services — a report on all the past services of the fleet for the specified period.
- Unit archived services — a report on all the past services of the unit for the specified period.
- Archived services by interval — a report on all the past services, created on the basis of a certain service interval.
To generate a report, indicate its parameters (type, element, time period) and click Execute.
The report can be exported to an XLSX file. To do this, click on the ![]() button in the upper right corner of the window.
button in the upper right corner of the window.
The contents of the report can be sorted by almost any of its columns. To do this, click on the heading of the required column. Buttons next to the heading indicate the direction of sorting: ![]() — for direct,
— for direct, ![]() — for reverse sorting. To change the direction, click on the name of the column. The contents of the report can also be filtered by the status of the service. To do this, click on the Statusheading and select the required item from the list that appears. The following options are available: All, Closed, Rejected.
— for reverse sorting. To change the direction, click on the name of the column. The contents of the report can also be filtered by the status of the service. To do this, click on the Statusheading and select the required item from the list that appears. The following options are available: All, Closed, Rejected.
You can change the selection of columns by ticking the ones you need in the list that appears when you click the icon
![]() .
.
Below is the list of columns available in the reports.
- Service — the name of the service.
- Description — the description of the service (if specified).
- Unit — the name of the vehicle for which the service was carried out. The column is available for reports on archived fleet services and services by interval.
- Status — the status of the service: closed or rejected.
- Start date — the start date of service.
- End date — the end date of service.
- Time in service — the duration of service.
- Overdue — the number of days/kilometers (miles)/engine hours that service has been overdue. If the service is completed in time, a dash is displayed in this column.
- Mileage — mileage value at the moment of service.
- Engine hours — engine hours value at the moment of service.
- Total cost — the total cost of the service indicated in its properties.
- Including parts — the cost of parts, specified in the properties of the service. The field is empty if no line items of the Part type were indicated or only the total cost is specified.
- Including labour — the cost of labour, specified in the properties of the service. The field is empty if no line items of the Labour type were indicated or only the total cost is specified.
Summary information for each column is displayed in the row Total at the bottom of the table.
The contents of the report can be copied to the clipboard.
Notifications
On the Notifications tab, you can configure sending of notifications about the service status changes to external servers, the Telegram messenger or e-mail, as well as enable or disable sending of already created notifications.
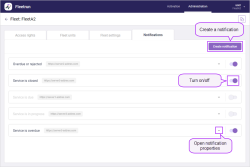
For each notification, its name is displayed in the list, as well as the address of the server, Telegram Bot API path or e-mail. Next to each notification, there is the icon that opens its properties, and the switch that turns the notification on and off.
Click Create notification to set up a new notification.
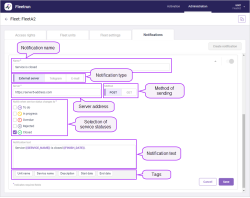
For notifications of all types, specify:
- Name
Required field. The maximum length of the notification name is 100 characters.
- Notify when service status changes to
The notification is sent once the service status changes to one of the selected values. At least one status should be marked.
- Notification text
The maximum length of the notification text is 512. It is possible to add tags into the text. When a notification is generated, tags are converted into the values which they correspond to. Thus, for instance, the Start date tag converts into the start date of service. Click on the tag to add it to the text. The following tags are available: Unit name, Service name, Description, Start date, End date.
The rest of the settings differ depending on the selected type of notification (see below).
After filling in the fields, click on the Save button. To delete a notification, open its properties, click the Delete button and confirm the action in the window that opens.
Sending notifications to the external server
Select the External server notification type and specify:
- Server
Required field. The server to which the notification should be sent. The maximum length is 256 symbols.
- Method
The method of sending the notification. Available options: POST and GET. POST is selected by default.
Start
Sending e-mail notifications
Select the E-mail notification type and specify:
- Recipient address №1
E-mail address of the main recipient of the notification. Required field.
- Subject
The subject of the e-mail. Required field.
- Recipient address №2/Recipient address №3
E-mail addresses of other recipients of notification (if necessary).
- SMTP-server
Activate this option if you want notifications to be sent from your SMTP-server. Specify the address of the server, port number, e-mail of the sender, username and password.