Correct Work of the Application
For the data to be correctly passed from the web application to mobile one, it is necessary to create drivers, warehouses, and orders in the same resource. To do so, create a driver in the monitoring system and in the web application’s settings on ‘General’ tab choose a resource of the driver created.
Measurement System
A measurement system applied depends on user settings.
Web Interface
Interface of the web application is divided into 2 panels: navigation menu (on the left) and working area (on the right).
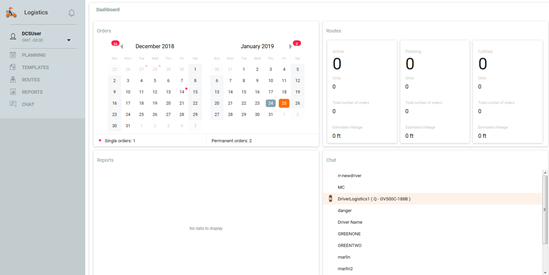
In the working area of the main page there is the Dashboard, which presents summary information and helps to quickly jump to the required tab. Dashboard consists of four sections: Orders, Routes, Reports and Chat.
The ‘Orders’ section contains summary information on the days in which there are undistributed orders (marked with a red dot) and the number of single and permanent orders.
The ‘Routes’ section contains summary information about active, planning and fulfilled routes.
The ‘Reports’ section displays statistical information on the last executed report for the previous day (if no columns are selected for the statistics table, the ‘No data to display’ message is displayed).
The ‘Chat’ section shows the list of drivers. If a new message comes from a driver, the line with the name is highlighted and an orange dot appears at the end of it.
Orders
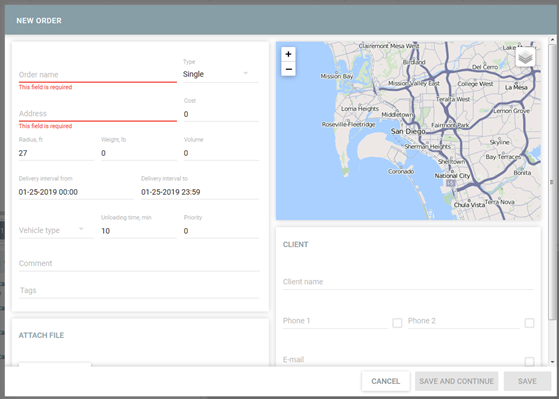
To create an order, choose ‘New Order’ in ‘Planning’ section (left panel). New order menu consists of 4 blocks: order’s parameters, map, contact details, files attaching.
An order may contain the following parameters:
Order name — an arbitrary name used for order registration in the system (obligatory field).
Type — 2 types of orders (single and permanent) are supported in the system. A single type order is intended for a single use. Its delivery interval contains both date and time. Orders of such a type are moved to history after execution. A permanent type order is intended for a multiple use. Delivery interval of such an order contains no particular date, but time (hours:minutes). Permanent orders are not moved to history after execution.
Address — a customer’s location address (delivery destination point). Note that before entering this field, it is recommended to choose an address provider (‘Settings’ section). Upon entering the first symbols of an address, a dropdown list containing the possible variants appears. Choose the necessary one from the list or type an address manually (obligatory field).
An indicated address is shown on the map by a marker. If necessary, a delivery destination address can be adjusted by dragging the marker to a corresponding point on the map. Moreover, a necessary destination address can be added directly from the map. To do so, click a corresponding destination point on the map.
Cost — total cost of goods in the order. Units of measurement for the cost values are indicated in the corresponding block of the general settings.
Radius, m — the maximum distance on which a unit should come close to an indicated delivery destination point and stop there in order a point to become visited (upon delivery point visiting a courier must confirm or reject an order by setting the corresponding status in the mobile app).
Weight, kg — an overall weight of goods in the order. This value can be taken into account upon distributing orders among units.
Volume — any conventional value (for example, items). Can also be taken into account upon distributing orders among units. Units of measurement for the volume values are indicated in the corresponding block of the general settings.
Delivery interval (from – to) — date and time interval for an order to be delivered. Pick dates in the calendar. Indicate initial and final dates of an interval. If an interval consists of a single day, then indicate it as both initial and final date of an interval. To summon a calendar, click one of the fields of a delivery interval. After indicating dates, click OK. Time of a delivery is edited manually.
Vehicle type — a preferable vehicle type for order delivery. This value is taken into account upon distributing orders among units. Dropdown list contains only the vehicle types indicated for units in the monitoring system (‘Profile’ tab of unit properties dialog).
Unloading time, min — an approximate duration for unloading goods.
Priority — a numeric value (from 1 to 99) showing the importance of an order upon distribution if a route validation is used. Orders with higher importance are distributed first. The higher numeric value indicated, the higher the importance of an order is. Priority is taken into account only for orders with overlapping delivery intervals.
Comment — an arbitrary comment regarding a delivery.
Tags — key words (any) on the basis of which orders can be sorted (planning section). To add a tag, click the field, enter a key word, and use Enter on your keyboard. To delete a tag, use Backspace or delete button.
A separate block (bottom-right) is devoted to contact details such as client name, phone number, and e-mail. A phone number and an e-mail indicated by a flag are used to inform a client on a courier’s arrival. Contact details are available to an operator on the stages of planning and delivery. Also, contact details are displayed for a courier in the mobile application.
An order can be attached with a file (for example, a bill or consignment document). The file attached can be viewed by a courier in the mobile application. A file attachment block is situated below order parameters. To attach a file, click the corresponding button.
Click ‘Save’ upon the form’s completion. Saved order is moved to the ‘Planning’ section.
Import Orders
Along with the manual creation of orders, the possibility of importing orders is supported as well. Import is performed using either CSV files in UTF-8 coding or XLSX files. These types of file may contain several orders simultaneously. For an optimal system performance the amount of orders in a file should not exceed 100. If any orders have not been imported, a corresponding notification appears.
Importing Dialog
To import orders, choose ‘Planning’ section in the left panel and click ‘Import Orders’ item below. Afterwards, the importing dialog appears in the right panel. This dialog provides the possibility to attach a file containing orders and create a template which can be used for this file as a header in the table of orders. For an imported file to be correctly recognized by the system, its template should possess the same sequence of parameters as an attached file. The maximum number of columns is 19. Though template creation and usage is a helpful feature, it is considered to be optional at this stage. After attaching a file, click ‘Import’.
In order to save the imported file for further work, each order should contain address information/coordinates (latitude and longitude), as well as the delivery interval (from — to). If one or several columns are missing, the ‘Save’ button will be inactive and the system will issue a corresponding warning.
Table of Orders
All the orders a file contains are placed in the table of orders. A file may also contain names for orders’ columns. In this case the names appear in the first line of the table. To avoid errors, it is necessary to hide this line (indicate the corresponding flag in the bottom of the table).
If a proper template hasn’t been created in the importing dialog, then it is necessary to indicate a name for each column in the header of the table (choose from dropdown lists). Sequence of names indicated in the header can be saved as a template for the further usage in the importing dialog. To do so, click the corresponding button in the bottom of the table (left corner).
If the sequence of columns, their number or names in the imported file differ from the parameters set in the header, then it is necessary to edit the header of the table correspondingly.
In case the column with the date is missing from the imported file, when you select the name of the empty column as ‘Time from’ and ‘Time to’, the time specified in the ‘General’ tab of the general settings will be automatically set, as well as for single orders the date will be set as tomorrow.
Table Editing
To edit any field of the table, click it and make necessary changes. These changes can be saved or canceled using either a keyboard (Enter, Esc) or the corresponding buttons in the bottom of the table (right corner). Moreover, changes are saved automatically upon switching to another field.
A multiple editing feature is also supported in the table of orders. To use multiple editing, indicate flags in the lines where similar information should be provided. Afterwards, edit any field of the table. As a result, identical changes are applied to the corresponding fields of the chosen lines.
If a mistake is made upon editing the table, move a step back by clicking ‘Undo’ in the bottom of the table (left corner). Up to 5 steps are saved in the system.
Buttons in the bottom of the table (from left to right):
- Add template — to save a current header of the table as a template.
- Add new column — to add new column to the table (the maximum number of columns is 19).
- Undo — to move a step back in case of editing mistakes (up to 5 steps).
- Cancel — to cancel orders’ import.
- Save — to save imported orders (saved orders are moved to the ‘Planning’ section).
The date and time format and the separator for the imported files are indicated in the ‘Settings’ section. In order import to be implemented correctly, the date and time format should be the same in the imported file, the application settings and the user settings in the monitoring system. The separator used in the file and in the application’s settings should coincide as well. In the import window to the left of the ‘Cancel’ button there is information about the date and time format specified in the settings.
Integration
Logistics Services is a service intended to automate the processes of import supported in Logistics program. This service provides you with a possibility for importing multiple orders or routes from both CSV and XLSX files or via JSON.
Moreover, the service provides you with a possibility to integrate Logistics program with either third-party services or ERP systems via special API for importing orders and routes.
To use Logistics Services, view its documentation first.
Planning
Delivery planning includes several steps: choosing orders (step 1), choosing transport (step 2), and routes building (step 3). The steps on delivery planning are performed using such interface elements as table (top part of the working area), map (bottom right part), and information block (bottom left part).
Some peculiarities of a delivery planning:
Only those single orders, the delivery interval of which corresponds to the current date can be added to the route.
Working with permanent orders (step 1), you should choose a delivery date (calendar in the bottom right corner of the table).
Routes building is implemented on the basis of an algorithm set on the corresponding tab of the settings. Parameters of an algorithm can be changed directly from ‘Planning’ section (on any planning step). To do so, click the ‘Gear’ button in the bottom right corner of the table, indicate necessary parameters, and apply or cancel implemented changes.
If a specific vehicle type is selected in the order parameters, the units of that type are displayed in the table when selecting the unit during step 2. To see other available units, use ‘Vehicle type’ filter in the left panel and check the required types from the drop-down list. Select ‘Any’ to display all available units, regardless of their type.
Table
Main actions on the delivery planning are performed in the table. Depending on the current planning step the table may contain created orders, available units (transport), and built routes. The planning step is shown in the lower left corner of the table. To move to the next step, first complete the previous one. At every step (until a route is saved) there is a possibility to go back to the previous one and make corrections. The number of columns in the table is configured individually (click the icon in the top right corner of the table).
Table supports a number of additional actions with an order:
- Edit — change order parameters.
- Copy — create new order with identical parameters (by default ‘Today’ is used as delivery interval).
- Delete — delete order from the system.
These actions become available upon pointing the cursor on a necessary order (buttons at the end of a line).
You can select several orders in two ways: check the required boxes in the first column or left-click on the orders while holding the Ctrl key. If you need to apply changes to several orders at a time, mark them in the table and press the ‘Edit parameters of selected orders’ button located in the lower part of the information block to the left of the ‘Delete’ button. In the opened dialog you can modify the delivery interval (from — to), the unloading time and the orders’ tags.
Map
Information presented in the table is visualized on the map (click an element’s line in order for the map to be centered on the selected element; check the box in order for the map to be scaled and centered in such a way that all the elements with the checked boxes are seen on it). Press to expand the map to the entire workspace. Clicking the button or anywhere in the inactive area of the screen restores the original size of the map.
Information on a particular element can be viewed directly from the map. To do so, summon a tooltip by clicking a necessary element. Moreover, the map can be used as a means of choosing orders. To select elements on the map, hold the Ctrl key and click on the required element. To select several elements, hold Shift and point out the area with the necessary elements on the map.
Information Block
Information presented in this block can be divided into 3 categories: information on the chosen element, general information on orders, and general information on routes.
Information on a chosen element (order, unit) is shown upon clicking an element’s line in the table and includes its detailed description. Order description is an information indicated upon order creation; unit description is an information indicated on ‘Profile’ tab of a unit properties dialog in the monitoring system. In the bottom of the information block there are buttons for editing or deleting an order chosen in the table.
General information is shown upon checking an element’s flag. On the 1st step of planning this piece of information includes such parameters as total weight, volume, cost, and number of orders; on the 2d step this piece of information is also accompanied by unit’s data (total carrying and effective capacities). In the bottom of the information block there is a button for deleting all the orders indicated in the table by flags.
General information on routes is shown on the step of routes building. Information on orders and units engaged in a route is added by data on distribution optimization and route validity parameters used.
Filters and Dynamic Search
Elements shown in the table are determined by the filters applied. Filters are used to quickly find the necessary elements. They are located in the left panel. Filtration is made by the following parameters: order type (single, permanent, single and permanent), delivery interval, warehouse, and warehouse parameters — for orders (1st step), as well as the warehouse parameters and vehicle type — for units (2nd step). By default, the warehouse used as a filter is the one indicated on the corresponding settings tab as the initial warehouse, default delivery interval is ‘Today’, and default vehicle type filter is ‘Any’.
A calendar is used to select a delivery interval. At the bottom of the calendar there is a drop-down list where you can select one of the fixed time periods (‘Today’, ‘Tomorrow’, ‘Next week’, ‘Next month’) or ‘Custom’ interval which allows you to set the period yourself. For the latter, you must specify its beginning and end. If the length of the interval is one day long, double-click the required day.
The red dots on the calendar indicate the availability of single orders on a certain day. Their number is displayed at the bottom of the calendar to the right of the drop-down list when selecting the delivery interval. Digital indicators next to the month switches indicate the availability of single orders and their number in the previous and next months.
Note that a warehouse’s filter value can be changed on the first planning step only.
Besides, the necessary elements can be found using dynamic search. The search field is located above the ‘Orders’ type’ filter. Search is performed by all the fields of the table.
Sorting by Tags
Orders filtered by delivery interval and warehouse can be sorted by tags added upon orders creation. To do so, choose necessary key words in the tags cloud (below the filters). Moreover, orders can be sorted by warehouse tags. In this case a table presents a list of orders, tags of which match the tags of a chosen warehouse. To sort by warehouse tags, it is necessary to enable the corresponding flag (‘Tags’) in ‘Warehouse parameters’ filter.
Routes Building (3rd step)
Select the orders (step 1) and the units for their delivery (step 2) and click the ‘Next’ button. On the basis of the algorithm used, a route is formed. For the optimal route building the algorithm considers such parameters as delivery interval, weight, and volume of goods in the order (if the corresponding settings are indicated), as well as warehouse working hours and unloading time (indicated on the ‘Warehouses’ tab of the settings). Moreover, upon a route building the algorithm considers requirements on the minimization of distance and time for a delivery. Pay attention to the fact that the distributed order created more than 10 days ago are deleted from the system automatically.
To view the sequence of delivery points to be passed, expand a route (click its line). Note that a formed route is considered to be preliminary. In other words, the sequence of delivery points of a formed route can be reestablished either automatically or manually.
To do it automatically, click ‘Refresh’ icon in the end of the line.
To automatically redistribute the points among the units or change their order, select the routes in which you want to make changes and click the ‘Optimize again’ button () at the bottom of the table (the numeric indicator on the button corresponds to the number of selected routes). This will result in re-optimization of the routes.
To reestablish delivery points manually, drag and drop them in the required sequence. Note that if several routes are formed, you can drag points from one route to another even if the number of orders exceeds the number specified in the ‘Route validity’ parameters.
At this stage, you can create a new route from the orders of the current route. To do this, select the required orders and press the button at the bottom of the table. The selected orders will be assigned to the new (‘other’) route. Click the icon to the right of this route to assign the unit and complete the third step of planning.
If in the second planning step no unit was selected, it is impossible to save the created route. Click the button to the right of the route name to assign the units. In the appeared dialog box, only those units that are currently not assigned to any other routes are displayed. The table with units can be sorted by any of its columns, for instance, by distance to the first order of the route. To find the required unit, in the search bar you can use wildcards ‘*’ (replaces any number of characters) and ‘?’ (replaces one character). Click on the required unit and press ‘Save’.
Note that upon a route building you can receive a situation when some of the route’s points cannot be visited in the indicated delivery interval. Such a point is marked in the estimated arrival column by a special marker (the marker is also duplicated beside the route name). In case such a situation emerges, delivery points can be reestablished either automatically or manually. If a delivery point is impossible to visit, it should be deleted from this route (click ‘Trash’ icon in the end of the line).
A built delivery route is displayed on the map. Route visualization color schemes can be set on ‘General’ tab of the settings section.
Click on the button located in the lower right corner of the information block to change the name of the route. To save a built and optimized route, click ‘Floppy disk’ icon at the end of the line. To save all the built routes, click ‘Save’ in the bottom right corner of the table. Saved routes are moved to the corresponding section.
Adding Orders to Route
It is possible to add orders to the already built route. To do this, select the necessary route and press the button located in the lower part of the information block. In the dialog that opens, select the order type (single or permanent) and click the line with the order you want to add to the route (you can only select one). After that, a dialog with the name of the route and a list of its orders opens. The added order is placed at the end of the list. However, you can change its sequence number by dragging it to the required position. After this, the time is re-counted, that is, all the orders that follow the new one, are moved taking into account the time needed for the travel and unloading. The delta of the modified arrival time for the moved orders is shown in red when it is increased and in green when it is decreased.
To confirm the introduced changes, click ‘Save’. To dismiss them, press ‘Cancel’. To go to the previous dialog, press ‘Back’.
New Unit Selection
It is possible to select a new unit for the routes. To do this, hover the mouse over the name of the route and click on the button, which appears at the end of the line. In the opened window the table with the units available to the user is presented. The units that have at least one trip scheduled for a stated time are not shown in the table. To filter the table by the units selected in step 2, activate the corresponding function. The table can be sorted by any of its columns, for instance, by distance to the first order of the route. To find the required unit, in the search bar you can use wildcards ‘*’ (replaces any number of characters) and ‘?’ (replaces one character). Click on the required unit and press ‘Save’.
If selection of a new unit occurs when part of the orders are visited, the current route is marked as fulfilled, and the non-visited orders are transferred to the route of the newly assigned unit.
Templates
This section stores the templates for creating routes. Existence of a template makes it easier to work with routes that are created regularly based on the same points, as the there is no need to go through the same planning steps each time the route is created.
Creating a template
To create a report template, mark the required permanent orders and activate the ‘Templates creation’ option in the calendar on the ‘Planning’ tab. Click ‘OK’ to confirm activation. In the next stage select the necessary units and click ‘Route templates’ to save. The created template will appear on the ‘Templates’ tab.
Working with templates
Templates can be edited, deleted, as well as new units can be assigned to them.
Press the button, located in the bottom right corner of the information block to change the name of the template.
Click to the right of the name of the template to assign a new unit to the route. The opened table with the units can be sorted by any of its columns, for instance, by distance to the first order of the route. To find the required unit, in the search bar you can use wildcards ‘*’ (replaces any number of characters) and ‘?’ (replaces one character). Click on the required unit and press ‘Save’.
Click on the ‘Pencil’ icon to edit the temlate. Press the button at the bottom of the dialog box to add new orders to the route. To change their sequence, drag the required orders up/down. Click the ‘Basket’ icon to the right of the point to delete it.
Press the ‘Basket’ icon to delete the route template.
Routes
This section is intended for the monitoring of routes delivery. Routes are displayed in the table according to their filter state (active/planning/fulfilled) chosen in the navigation panel. Moreover, particular routes can be found using dynamic search (navigation panel). A search is implemented on the basis of current table data.
The active route is:
the route till the first poins of which remains the time indicated in the ‘Advance time’ field;
the route that has at least one point with the status ‘Assigned’, ‘Delayed’ or ‘Missed’,
The planning route is the route, the activation time of which has not come.
Fulfilled is:
the route in which all orders are visited or the status (confirmed/rejected) is set for all orders;
the route completed according to the auto completion settings.
Information on the fulfilled routes is displayed for 24 hours, afterwards it is automatically moved to history. Besides, if it is necessary to send information on fulfilled routes to history without waiting 24 hours, you can do it manually (choose the corresponding route in the table and click ‘Trash’ button in the information block).
On the basis of the data on fulfilled routes stored in history, you can generate reports in the corresponding section.
Working with Routes
‘Routes’ section consists of the same interface elements described earlier: the table, the map, the information block, and the filter.
Active routes are shown in the table by default. Upon clicking the route’s line, a route’s fulfillment icon becomes active, a corresponding route is displayed on the map, and the map is centered and scaled in such a way that all delivery points get into vision field. Moreover, current data on the chosen route is shown in the information block.
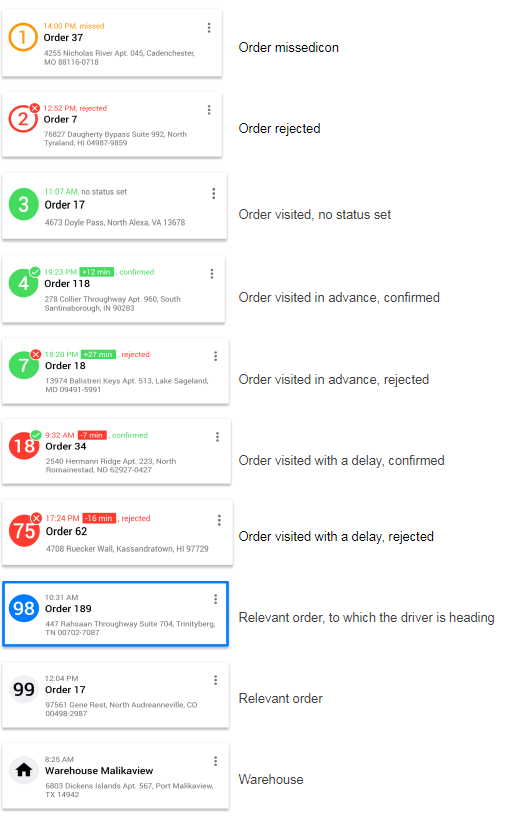
Upon clicking the arrow (in front of the route) the list of delivery points (orders) in this route is expanded and the route is displayed on the map (route’s fulfillment icon becomes active). The map is not centered and scaled. The expanded route shows all the orders arranged in the sequence of their delivery (orders = delivery points). The table contains visual elements used to determine a route’s fulfillment state.
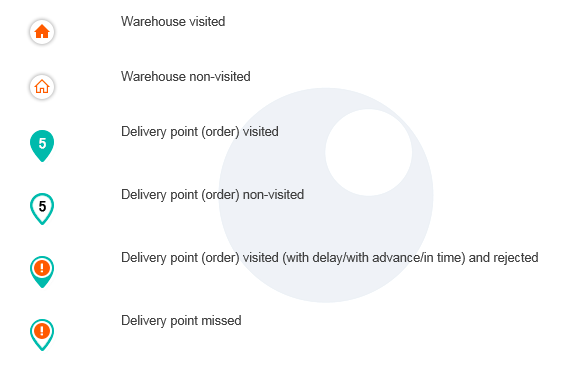
Route’s point state:
The line of the point towards which a unit is moving is marked by a green dot and highlighted in green. If one unit is assigned to several routes, the nearest (timewise) point is marked.
Note that 2 types of values are shown in such columns as ‘Arrival time’ and ‘Mileage’. These are estimated and actual values. Estimated values are the approximate values calculated by the system. Upon a delivery point visiting estimated values are changed for actual ones. Actual values are shown in the table by a slightly brighter color.
Click on the button located in the lower right corner of the information block to change the name of the route. To delete a route from the table, place a cursor over a route’s line and click the appeared ‘Trash’ icon.
If during deletion or auto completion of a route the latter has single non-visited orders, they are not removed, but copied with the same date and time and can be found among single orders on the ‘Planning’ tab.
Displaying a Route on the Map
A route chosen in the table is shown on the map. The system provides the possibility for visual comparison of planned and actual routes. Therefore, an actual route can be displayed on top of a planned one. A actual route is shown on the map by a solid line, a planned route — by a dotted one. To enable the displaying of actual routes, click the icon in the top right corner of the map (Show/Hide actual route). An actual route is shown on the map until its complete fulfillment or until the end of the delivery interval. Route visualization color schemes can be set on the ‘General’ tab of the ‘Settings’ section.
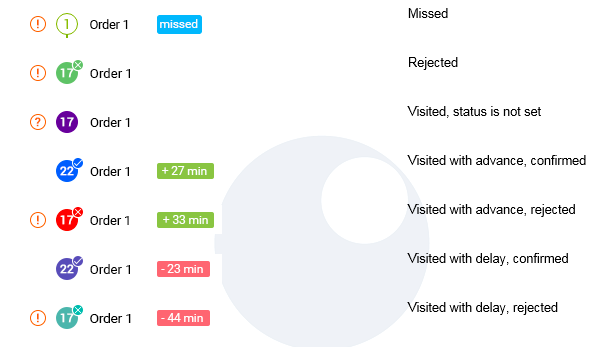
Upon choosing a route in the table, the map is centered and scaled in such a way that all delivery points of a route get into vision field. To center the map on a particular delivery point, click it in the table. A route fulfillment state can be recognized by the markers used on the map:
Working with the map you can view information on elements (route points, units) by summoning their tooltips. To do so, click the necessary element on the map.
A double click on a unit name in the table centers the map on the route it is assigned to.
Information Block Usage
The same as in ‘Planning’ section, the logic of the information block can be divided into two components: showing general information and showing information on a particular route.
If no routes are chosen in the table, the information block shows general data on routes presented in the table (total number of routes and total number of orders in them).
Current data on a particular route is shown in the information block upon clicking the line of a corresponding route in the table. This data includes name of a unit assigned for the route implementation, number of orders in the route, estimated and actual route duration, estimated and actual mileage, driver name, time of route auto completion, sequence in which orders should be visited, etc. From here a fast transition to the ‘Chat’ section is available. In order to communicate with a driver, click a driver’s name.
Information on a chosen route can be exported in both XLSX and PDF formats, or printed. While printing a route you can choose one of the available options: ‘Print unit route’ (the orders are printed in direct order) or ‘Print load plan’ (the orders are printed in reverse order). A chosen route can also be moved to history before its execution. Moreover, you can add orders to a built route. The corresponding buttons are situated in the bottom of the information block.
Information block supports the possibility of working with route’s delivery points (orders). Delivery point’s data includes its address, estimated and actual arrival time, estimated and actual mileage. Some order values (name, cost, radius) can be edited. To do so, click ‘Edit’ button in the bottom of the information block. Note that using the information block an operator can set delivery points’ statuses (corresponding buttons in the bottom of the information block).
Multiple operations with routes
To select routes, use the button in the left corner of the table header. Mark necessary routes by checking the boxes in front of their names. To select all the routes in the list, hold the Ctrl key and click on any unmarked check box. To deselect all routes, do the opposite. For all the selected routes you can see their ways on the map, the orders that form them and the assigned units (icon and name).
After clicking on the arrow in front of the name of any marked route, a list of orders of all marked routes is opened and they are shown on the map.
If more than one route are selected in the table, in the information block you can see the sum of data on them: the quantity of units, of selected routes, of orders; the overall estimated mileage; the total cost, weight and volume. In the lower part of the information block there are buttons for printing (routes or road plans) and deleting that apply to all the routes selected in the table at once.
Unit Changing on the Route
It is possible to change the unit for the routes in the planning state. To do this, hover the mouse over the name of the route and click on the button, which appears at the end of the line. In the opened window the table with the units available to the user is presented. The units that have at least one trip scheduled for a stated time are not shown in the table. The table can be sorted by any of its columns, for instance, by distance to the first order of the route. To find the required unit, in the search bar you can use wildcards ‘*’ (replaces any number of characters) and ‘?’ (replaces one character). Click on the required unit and press ‘Save’.
If the unit is replaced on the route that has rejected orders, the latter are marked as ‘missed’. If necessary, it is recommended to reject them again.
Attached Files
Upon setting an order’s status (in Logistics Mobile), a courier has a possibility to supply a comment with an electronic signature or a file. An electronic signature is transferred to the web-version as a photo and shown along with other attached files by ‘Paper clip’ icon in the table, information block, and order’s tooltip on the map.
To see a list of files attached, click the ‘Paper clip’ icon. The list contains names of files and download buttons. To preview a file, click its name; to download it, click the corresponding button.
Reports
This section provides a possibility of generating various reports regarding routes. Reports can be used for the complex analysis of a courier’s work.
Prior to a report generating it is necessary to set its configuration and adjust the table view.
Report configuration consists of the following parameters: report type (unit/driver, as well as unit group/driver group), order type (all, visited, visited late, fulfilled, rejected, visited without status, non-visited), unit, and report interval. Configuration parameters can be chosen from the dropdown lists in the left panel of the application.
Report interval can be either set using a ‘Quick interval’ (yesterday, today, last week, last month, last 7 days, last 30 days) or chosen in the calendar. Working with the calendar, it is necessary to pick initial and final dates of an interval. If an interval consists of a single day, then indicate it as both initial and final date of an interval. After indicating report’s interval, click OK.
Set the table by choosing parameters to be shown in a report (double click, drag and drop, or click ‘—>’). It can be table data (in reports on units/drivers or groups of units/drivers) or statistics (in reports on units). To summon the settings dialog, in the left panel click the corresponding icon to the right of the report type field. To apply the chosen settings, click OK.
To receive a report on the basis of chosen configuration and indicated settings, click ‘Execute’. A report is shown in the working area.
A report can be printed as well as exported in XLSX or PDF formats. To do so, use the corresponding buttons in the top right corner of the working area.
Chat
This section is designed to communicate with drivers. Moreover, the chat supports viewing photos received from the mobile application.
Arrival of a new message is accompanied by a beep (click on the button in the upper right corner of the chat to disable the sound). The digital indicator in the left panel and next to the driver name in the chat indicates the number of unread messages.
Settings
This section is designed to work with general settings as well as settings of warehouses and planning. To open the ‘Settings’ section, summon a user menu (click a user name) and choose the corresponding item. Afterwards, choose a tab to work with.
The section is not available for modification to the users that do not have the option ‘Can change settings’ activated in their properties in the monitoring system.
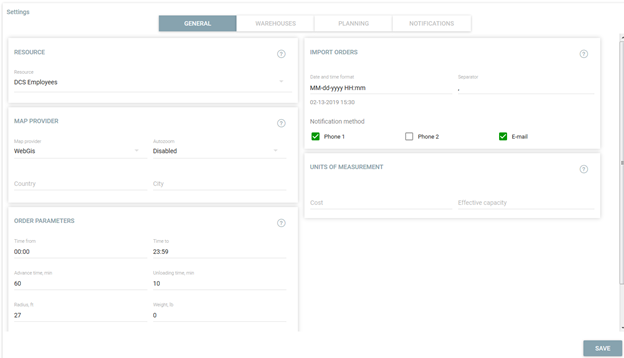
General
On the ‘General’ tab you can find the parameters used upon orders creation, their distribution, and routes displaying. Values indicated here are used on the corresponding stages as the default ones. The resource chosen here is the one where orders are created. By default, the resource created by the user is selected. If there is no such resource — the first one in the list of available.
By choosing address provider (WebGIS, Google, Yandex) you define a source of address information which is used upon manual order creation, import, or warehouse creation. Enable autozoom if you want the map to change the focus and scale when you click on the order during planning. If WebGIS maps are selected as address provider, in the fields that appear below, it is possible to specify the country and city within which the search is performed.
Delivery interval (from – to), weight and unloading time are taken into account upon delivery planning. Advance time is the amount of time that a delivery can be advanced (a route becomes active when the indicated time value remains before the visit of its first delivery point). Such value as radius is taken into account upon delivery point visiting. Route color, depending on a chosen option, can either be taken from unit properties (corresponds to a track color) or be random.
The ‘Import orders’ block serves for setting the parameters (date format, separator) used in imported files. Besides, here you can indicate a notification method used for orders’ import. ‘Units of measurement’ block serves for indicating corresponding units for the cost and effective capacity values.
Warehouses
To create a warehouse, click ‘Add warehouse’ button. Afterwards, a corresponding form appears. Obligatory fields of the form are warehouse’s name and address (note that before entering this field, it is recommended to choose an address provider on ‘General’ tab of ‘Settings’ section). Upon completion of the address field, a warehouse is shown on the map. Additional fields of the form are telephone number, warehouse working hours, unloading time, comment, and tags.
Special attention should be paid to the tags. Tags are custom key words intended for sorting orders on the stage of delivery planning (1st step). There are two types of tags utilized in the system: order tags and warehouse ones. Warehouse tags show that orders with such tags are attached to a particular warehouse. On the stage of choosing orders (1st step), sorting by warehouse tags can be applied by enabling the corresponding flag (‘Tags’) in ‘Warehouse parameters’ filter. Upon enabling this flag, a table presents a list of orders, tags of which match the tags of a warehouse used.
To add a tag, click the field, enter a key word, and use Enter on your keyboard. To delete a tag, use Backspace or delete button.
Geofences Attached to the Warehouse
Geofences created in the monitoring system can be attached to warehouses. This attachment is used in the delivery planning section. If a warehouse (with attached geofences) is chosen as a filter, then on the 1st step of a delivery planning, a table contains orders situated within the limits of geofences attached.
Units Attached to the Warehouse
Units created in the monitoring system can be attached to warehouses. This attachment is used in the delivery planning section. If a warehouse (with attached units) is chosen as a filter, then on the 2d step of a delivery planning, a table contains units attached to a chosen warehouse.
Deleting/Editing Warehouse
To delete or edit a warehouse, click the icon in the end of the field (3 dots) and choose the necessary action.
Planning
On this tab you should indicate a set of parameters to be used as default algorithm upon building a route in ‘Planning’ section.
Distribution Optimization
First of all indicate if you are going to utilize routing in the route building algorithm. The usage of routing allows calculating estimated arrival time considering road speed limits. Besides, upon routing usage the system provides the possibility to increase an estimated arrival calculation’s accuracy by means of implementing speed coefficients for both inside and outside a city. Let’s use an example. A supposed route is laid both through a city and outside it. You know for sure that at specified delivery interval there is the highest city traffic that results in decreasing an average speed in half. Moreover, you have an information that there is a road work on your route outside the city that will also lead to decreasing an average speed by one third. These issues may result in considerable differences between estimated and actual arrival times. To avoid such an inaccuracy, the coefficients are used. You need to decrease average speed coefficients inside and outside a city by half and third, correspondingly. Therefore, time for overcoming the obstacles will be considered in the route building algorithm.
If no routing is chosen to be used in the route building algorithm, then the system provides the possibility to indicate a vehicle’s average speed.
Moreover, choose warehouses to be used upon route building. Three types of warehouses can be utilized for this purpose: initial, intermediate, and final.
Initial warehouse is the one a courier starts a route from.
Intermediate warehouse is the one to be visited by a courier in case of applying the corresponding action.
Final warehouse is the one at which a courier should finish a route.
Route Validity Parameters
Choose parameters a route should correspond to (mileage, duration, number of orders, idling), and a unit fulfilling a route should correspond to (carrying and effective capacities). If a route cannot be built without exceeding any of the indicated parameters, then the route building algorithm is added by an action chosen in the next block.
Note that values of such parameters as carrying and effective capacity are indicated on ‘Profile’ tab of a unit properties dialog in the interface of the monitoring system.
Activate the ‘Use optimal number of units’ option if you want all the units selected in the second step of planning to be used when distributing orders and building a route.
Actions
Choose an action to be used by the program in case of a failure to build a route according to the route validity parameters indicated. The following variants are available:
- Use valid route — in this case a distribution of orders on units is made in such a way that route validity parameters not to be exceeded. For example, 5 is indicated as a number of orders in the route validity parameters block, but you would like to distribute 10 orders on 1 unit. As a result, a route is formed. It contains 5 orders (delivery points) chosen by their priority. The rest orders are not distributed at all.
- Visit intermediate warehouse — in this case the indicated parameter value can be exceeded only by adding a visit to an intermediate warehouse. Let’s use the above mentioned example. A distribution results in the following route: 5 orders (delivery points), intermediate warehouse, 5 orders (delivery points). Orders are chosen by their priority.
- Create separate routes — in this case the indicated parameter value can be exceeded only by creating a separate route. Let’s use the same example. As a result we receive 2 routes with 5 orders (delivery points) each. Orders are chosen by their priority.
Route Settings
Here you can indicate the time of route auto completion and specify the sequence of visiting orders.
Route auto completion — the time when the route should disappear from the list on the ‘Routes’ tab. In the drop-down list, select one of the options:
At certain time — the route disappears from the list in the period indicated in the ‘Time (HH:MM)’ field. If the last order is visited after the specified time, the validity of the route is set for the next day.
Last order + — the route disappears from the list in the time period specified in the ‘Time (HH:MM)’ field after the last order is completed.
Orders should be visited — a sequence in which the orders of the route should be visited.
Arbitrary — orders are visited strictly in due course.
Strict (one by one) — orders are visited in a free order.
Notifications
On this tab, you can configure notifications for the client, driver and operator.
Client Notifications
A message about the arrival of the courier or the status of the order can be sent automatically to the phone number and/or e-mail provided and selected while creating an order. To set up a notification template, select its type, specify the subject and text of the e-mail and the text of the SMS. For some orders it is required to indicate the time/distance until the arrival of the courier when the client should be notified.
When creating an e-mail notification template, in the ‘Text’ and ‘HTML’ tabs enter the message in text or HTML format, respectively. The ‘Text’ tab can also be used to preview the message entered in HTML format. To save the notification template, click ‘Save’. To correctly display the e-mail notification, the recipient should enable the HTML feature.
If orders are imported, the notification method should be indicated on the ‘General’ tab of the settings section in the ‘Import orders’ block.
Driver Push Notifications
Push notifications for the driver allow you to inform the driver about such events as route creation or deletion, contact details change, attaching or deleting files, order parameters change, delivery point missing, exceeding delivery or unloading time, as well as deviation from a route or changes made to it, and lack of order confirmation. To receive push notifications, activate the ‘Notifications’ option in the Logistics Mobile settings, and in the user properties grant the resource to which the driver belongs to the ‘Create, edit, and delete drivers’ access right.
Select the type of notification and enter its text. By default, each notification has a special text template that can be used or modified.
In the text fields of this tab, you can add tags that can be used in the message: the name of the order and driver, the time of planned arrival, cost, current location, etc. These tags are then converted to real values. Note that a notification with the ‘Current location’ tag contains a link to the locator map (active for 60 minutes) which indicates the location of the courier, and for time and route deviation alerts you must specify numeric values.
Operator Notifications
Notifications that are automatically sent to the driver can be sent to the operator as well. Such notifications are displayed in pop-up dialogs in the top right corner of the workspace. Pop-up dialogs last for 15 seconds (5 seconds for standard browser notifications). For a more thorough view of the list of sent push notifications, click indicator of the incoming notifications (‘bell’) located in the upper right corner of the left panel (the last 5 are shown).
In this section of the settings, you can enable/disable the display of notifications for the operator, as well as a sound signal about their arrival. The digital indicator, which appears in the left panel (instead of the ‘bell’), signals about the presence of notifications. Click on it to view the notifications. To the right of the ‘magnifier’ icon is the search bar, which helps to filter the notifications. Click on ‘Show all’ to expand the list of notifications. To delete all notifications, click ‘Clear list’.
Mobile Application
To work with Logistics Mobile, create a driver in the monitoring system and assign him to a unit. In a driver properties dialog it is necessary to enter a phone number and a mobile key. Indicated values are used as login (phone number) and password (mobile key) for the application authorization. Note that blocking user-creator of a resource to which a driver belongs leads to restricting access to this driver as well.
Settings
Map — choose a map source (OpenStreetMap, Google Roadmap, Google Satellite, Google Hybrid, WebGIS Maps).
Photo quality — choose image quality to be used upon photo sending. The following variants are available:
- Original — an original image without quality loss;
- High — an original image is compressed to 3 megapixels (not more than 600 kb);
- Medium — an original image is compressed to 2 megapixels (not more than 300 kb);
- Low — an original image is compressed to 1 megapixel (not more than 100 kb).
Tracker — enable/disable a tracker. To use a tracker function in your application, choose ‘MiTag’ as device type and indicate unique ID (arbitrary value) in a unit properties dialog (monitoring system). Afterwards, a tracker’s switch appears in your mobile application settings.
Notifications — enable/disable receiving of push notifications on relevant events regarding orders, routes, and delivery process; choose an appropriate notification signal.
Admin password — set and enable/disable a password to be used upon working with mobile application settings.
Help — link to a user manual.
Working with Logistics Mobile
For setting order status it is necessary to click this icon (3 points in the top right corner of the order) and choose the corresponding status (confirm/reject) in the appeared menu. Moreover, this menu can be used to contact a client (‘call’ button).
Upon setting an order’s status, a courier has a possibility to enter a comment (optional upon confirmation; obligatory upon rejection), identify oneself with an electronic signature, or attach a file. These steps provide an operator with a possibility to monitor delivery processes and undertake any action on the basis of relevant information.
An order chosen from the list is shown on the map by a marker. The map is centered and scaled on the chosen order. On the map screen you can move between orders by swiping (left-right) the order’s block in the top of the screen.
To quickly move on the map to your own location, tap the button in the bottom right corner. This button has several states: arrow — tracking unit’s location, route’s points — showing all the route’s delivery points on the map. To activate unit location tracking, tap the arrow. Afterwards, the map stays constantly centered on your location. Upon moving the map from unit’s location manually, ‘Arrow’ button changes for ‘Target’ one, by tapping which the map is centered on your location once again. To escape tracking mode, tap the button (route points) once more.
Devices on Android and iOS platforms define the location differently: Android devices show the location of the unit to which the driver is bound, while the iOS ones display the location of the device.
If it is necessary to build a route to a delivery point, you can use an external application. To do so, tap and hold a point towards which you would like to build a route.
From the map screen you can move to viewing detailed order’s information. To do so, choose a necessary order in the top of the screen and tap ‘Order info’ button in the bottom. The appeared menu serves for viewing order’s information, setting order’s statuses (confirm/reject), and calling a client (call).
The mobile application is provided with a tracker mode. This mode can be used to determine a courier’s location if no vehicle or personal tracker is available. After activating this mode, location data is collected and sent to the server constantly (in iOS version data is collected and sent upon movement detection). To enable the tracker mode, move to the menu and activate the corresponding switch.
Logistics Mobile application is also available on tablet. A tablet version has some peculiarities. The first one is that tablet’s screen size allows viewing detailed order info without hiding the list of orders. The second is that special buttons (situated below the detailed info menu) are used for setting statuses and calling a client.